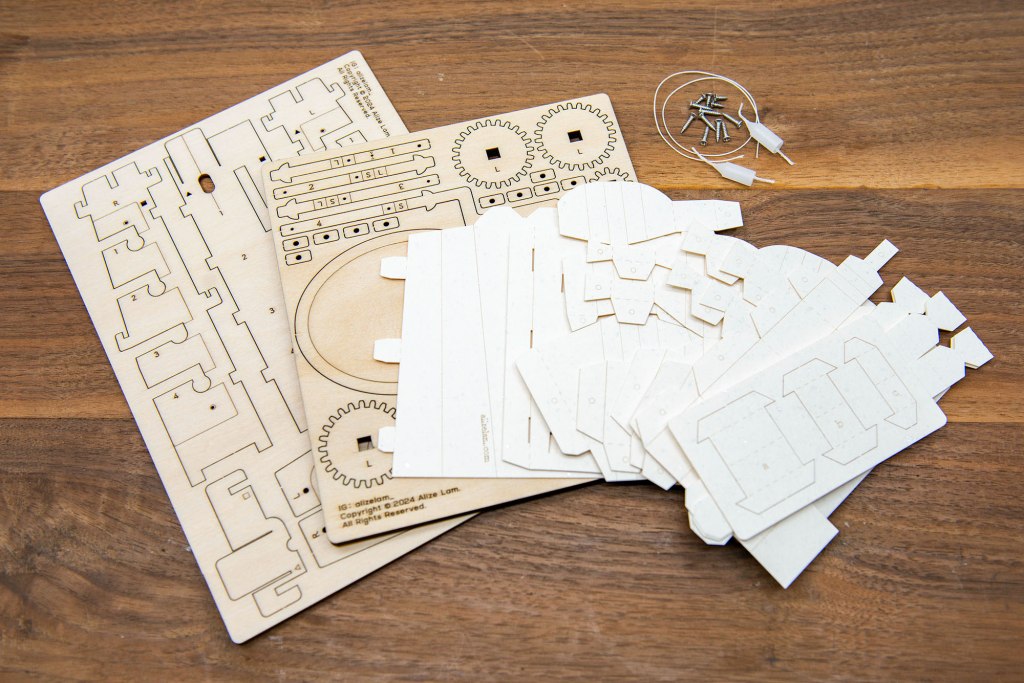
The Finger Automata DIY Kit:
1/ 木片 x2
2/ 卡紙 x10
3/ 小零件 (螺絲、蠟燭,繩)
The Finger Automata DIY Kit:
1/ Wood components x2 pcs
2/ Card x10 pcs
3/ Small parts (screws, wax, thread)
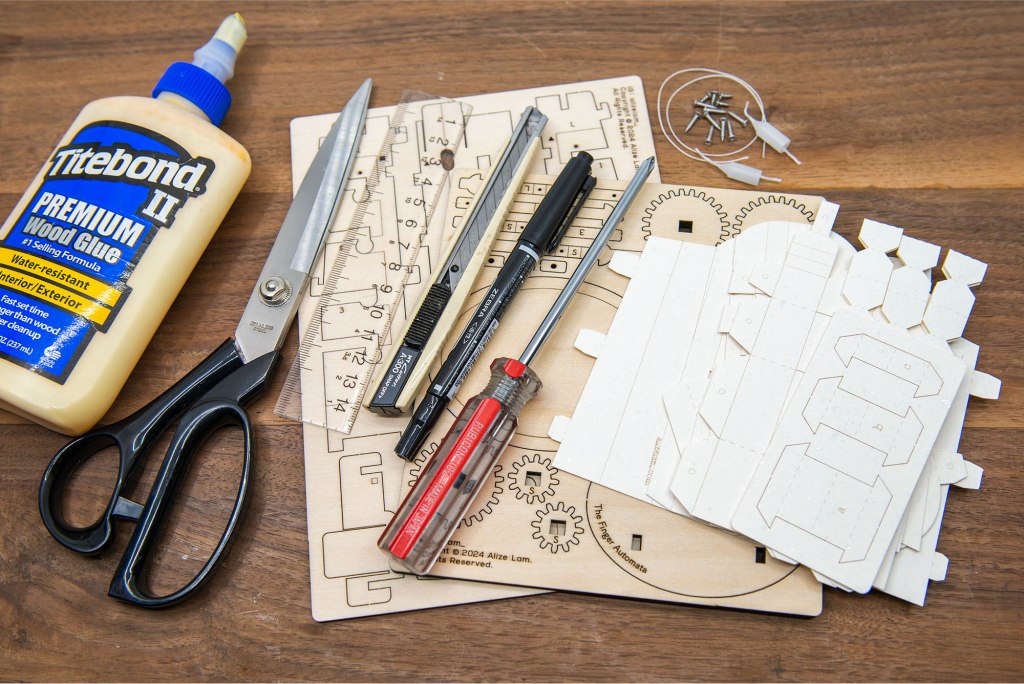
工具:
1/ 木工膠水
2/ 剪刀
3/ 間尺
4/ 水筆
5/ 螺絲批
Tools:
1/ Wood Glue
2/ Scissors
3/ Ruler
4/ Marker
5/ Screw driver
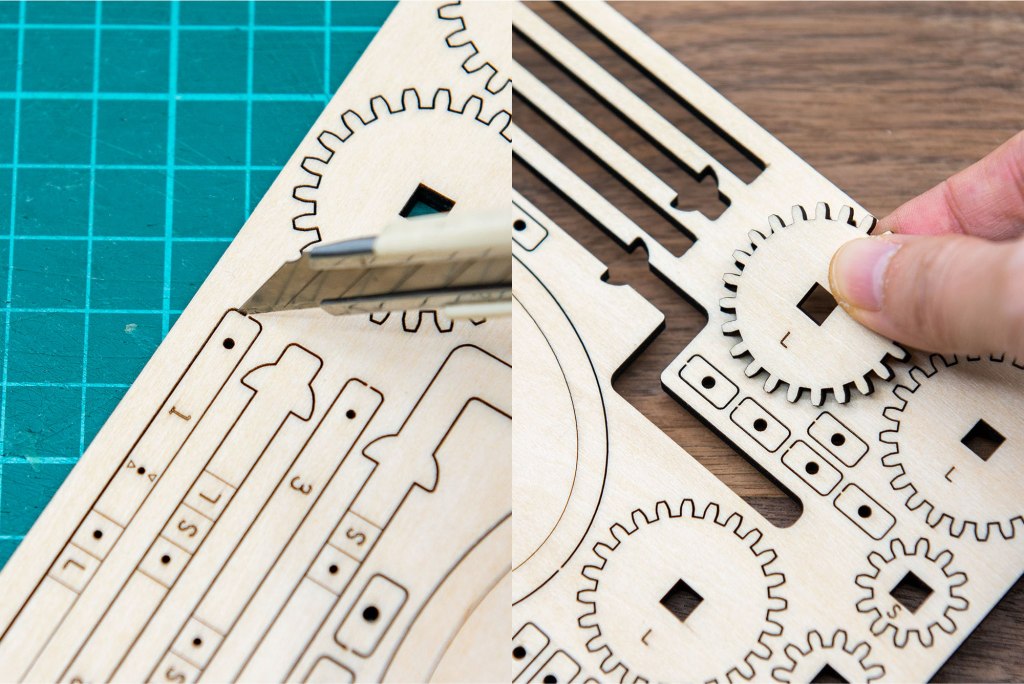
取出木零件:可用𠝹刀或手取出
How to take the wood components out: Use cutter to cut or push out the components.
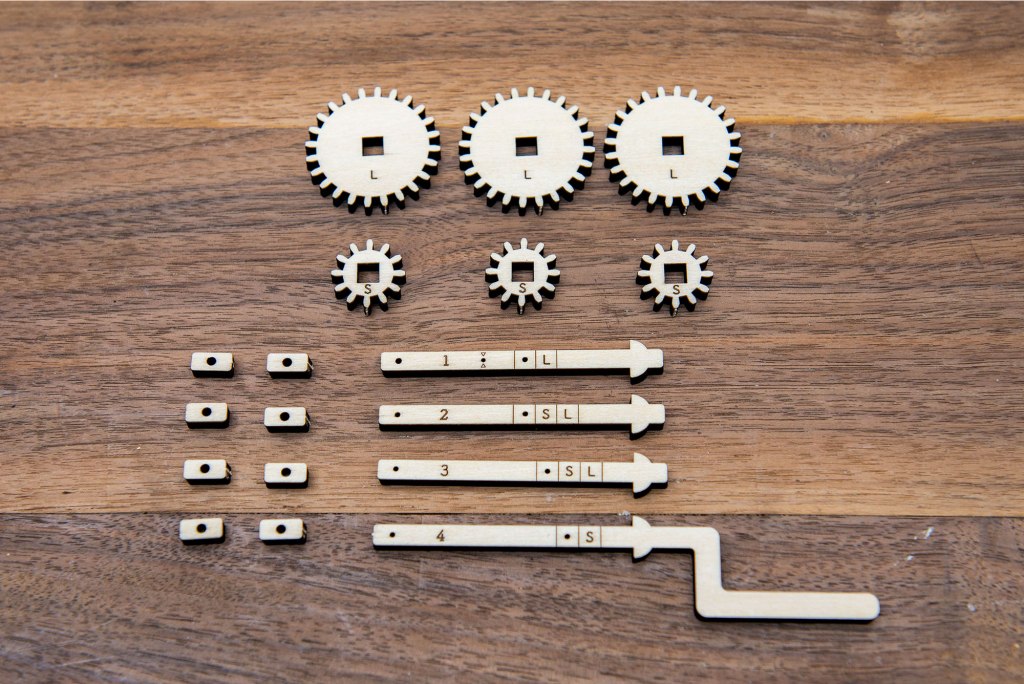
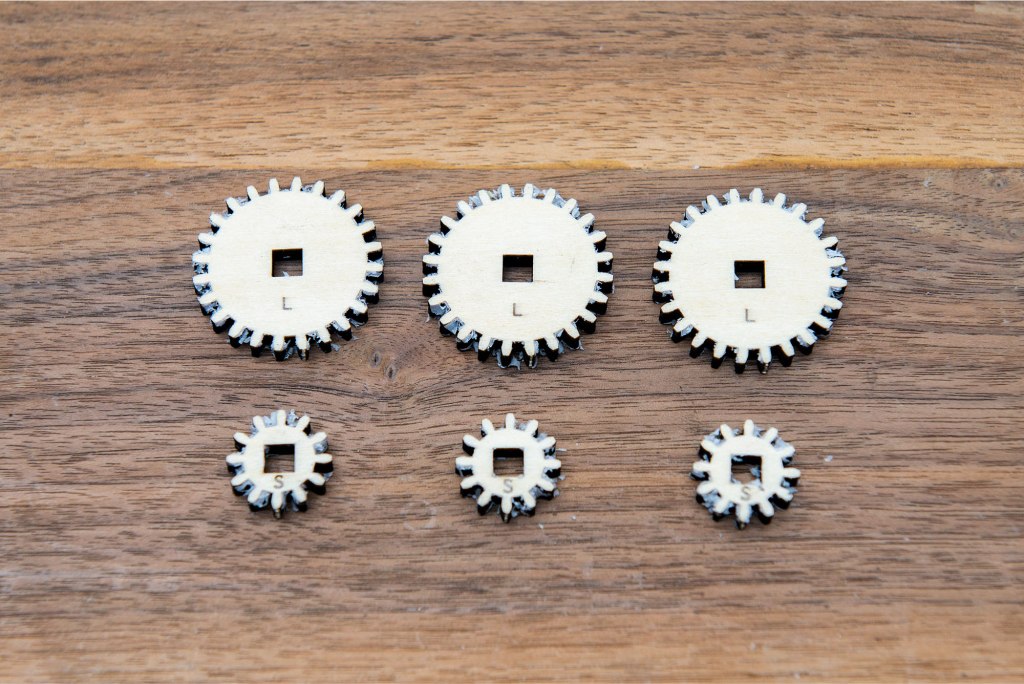
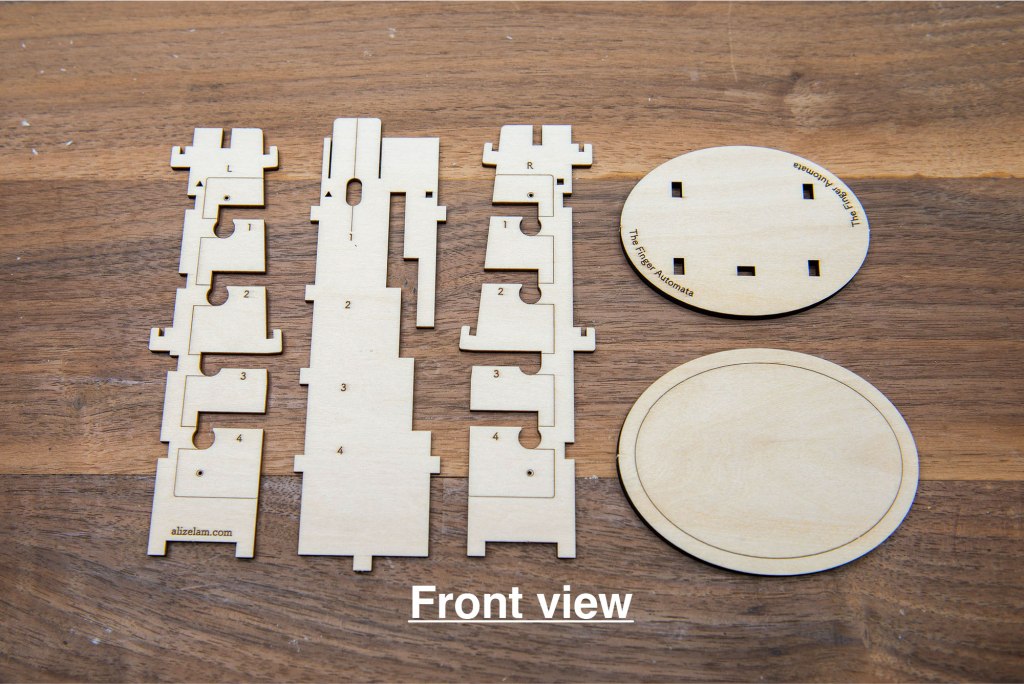
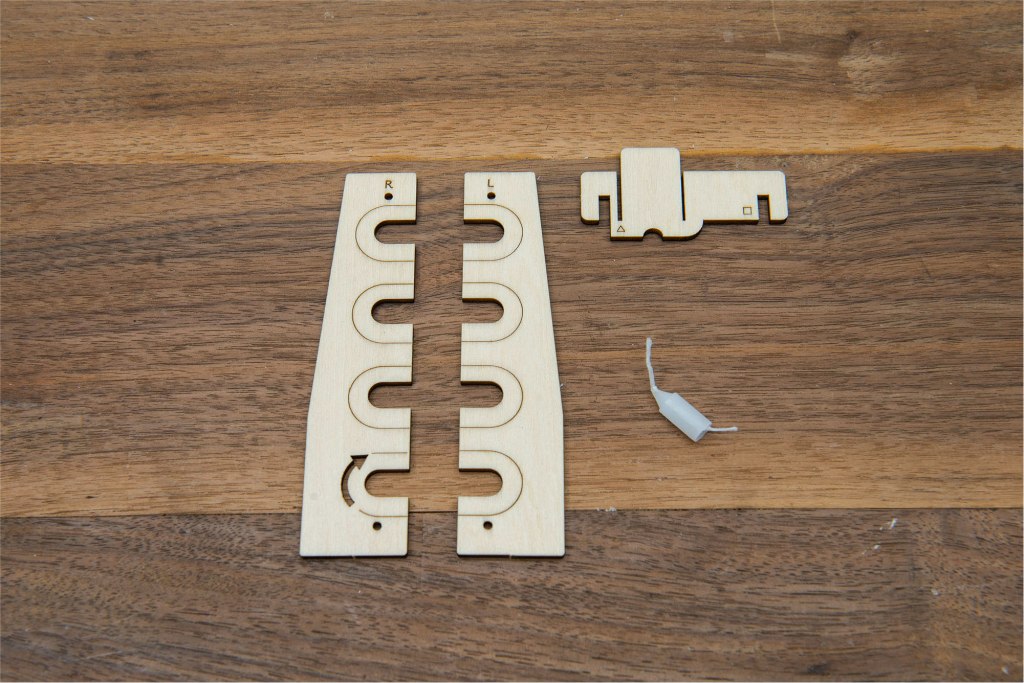
1/ 取出以上零件。
1/ Take these components out.
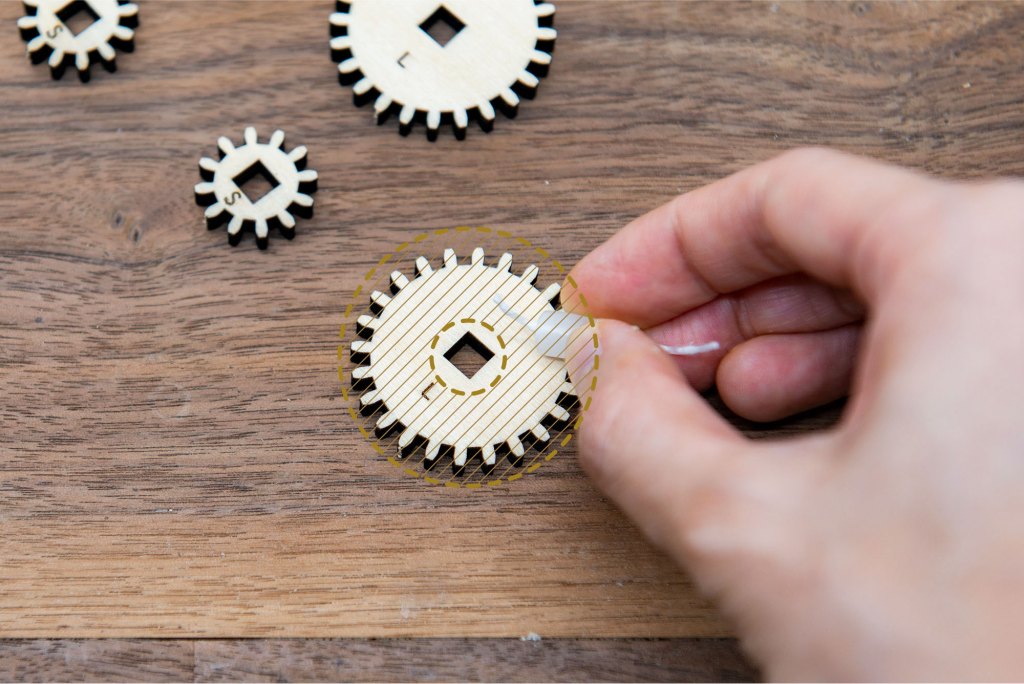
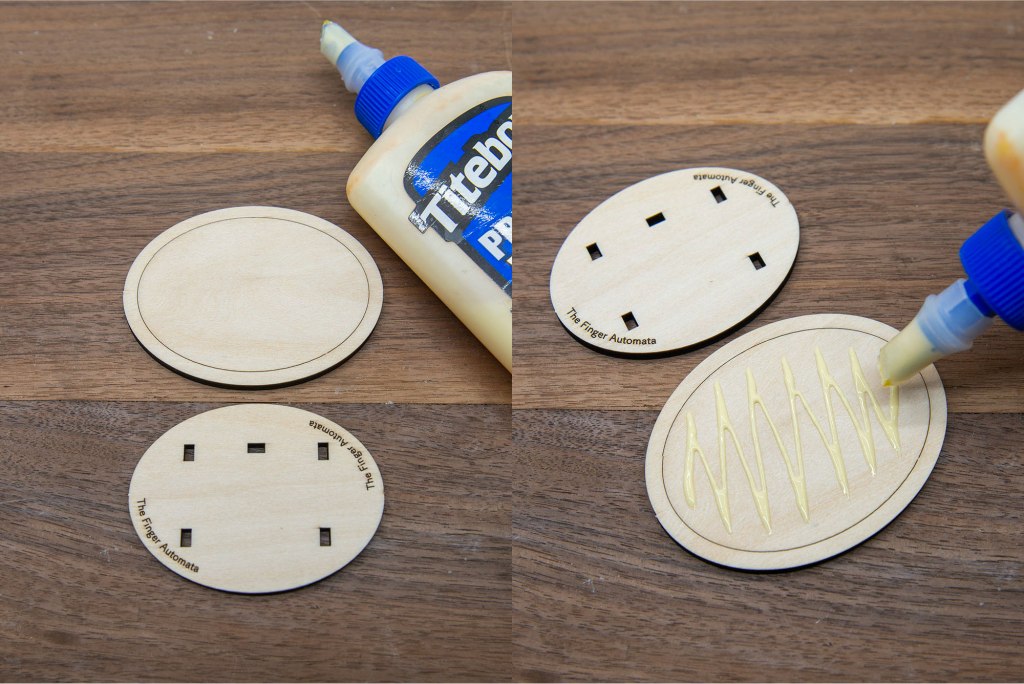
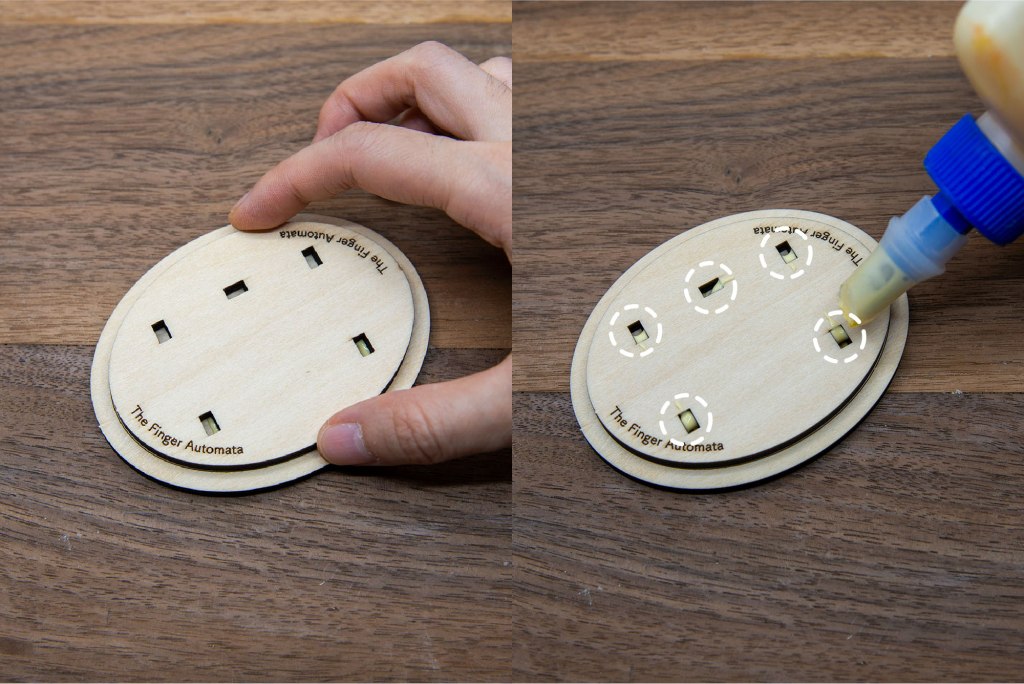
2/ 在所有齒輪,上圖斜線部份塗上一層蠟。
2/ Apply a layer of wax to all gears, as indicated by the shadowed area in the picture above.
3/ 完成如上圖。
3/ After applying wax.

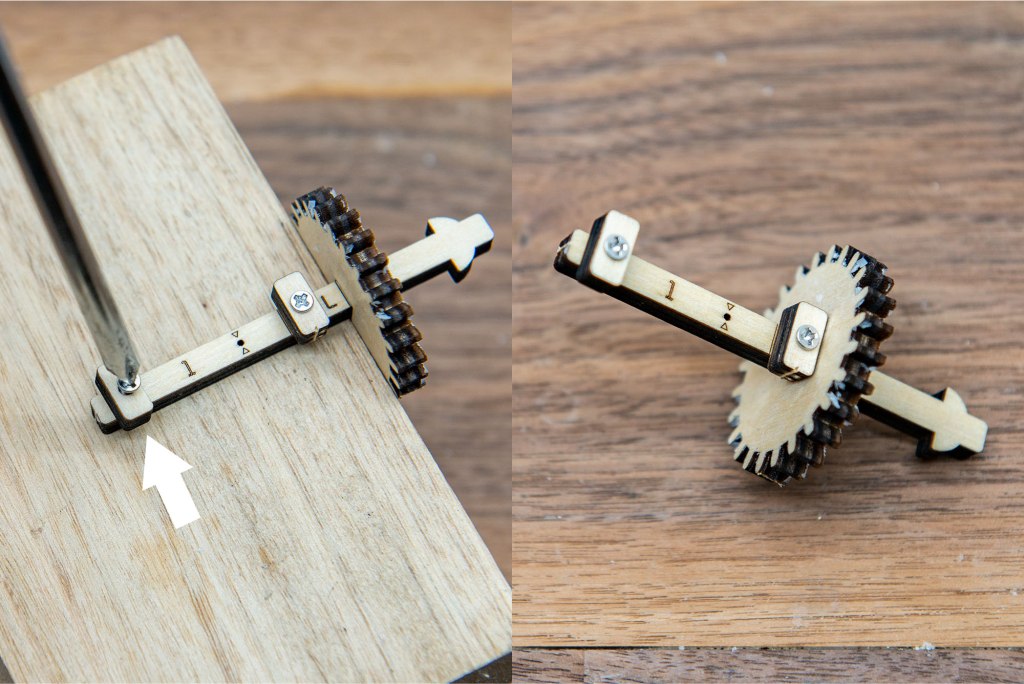
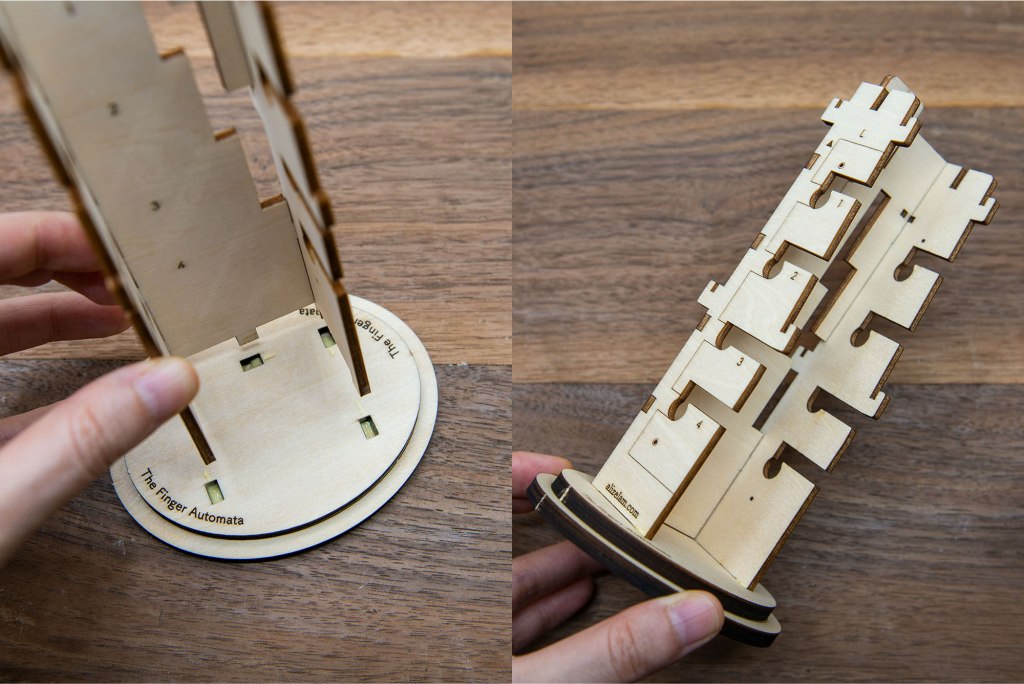
4/ 取出2粒A螺絲,取出圖右的木零件 (1號桿、L齒輪),以及螺絲批。
4/ Take out the 2 A screws, the wooden parts shown in the right picture (No.1 stick & gear L), and screwdriver.
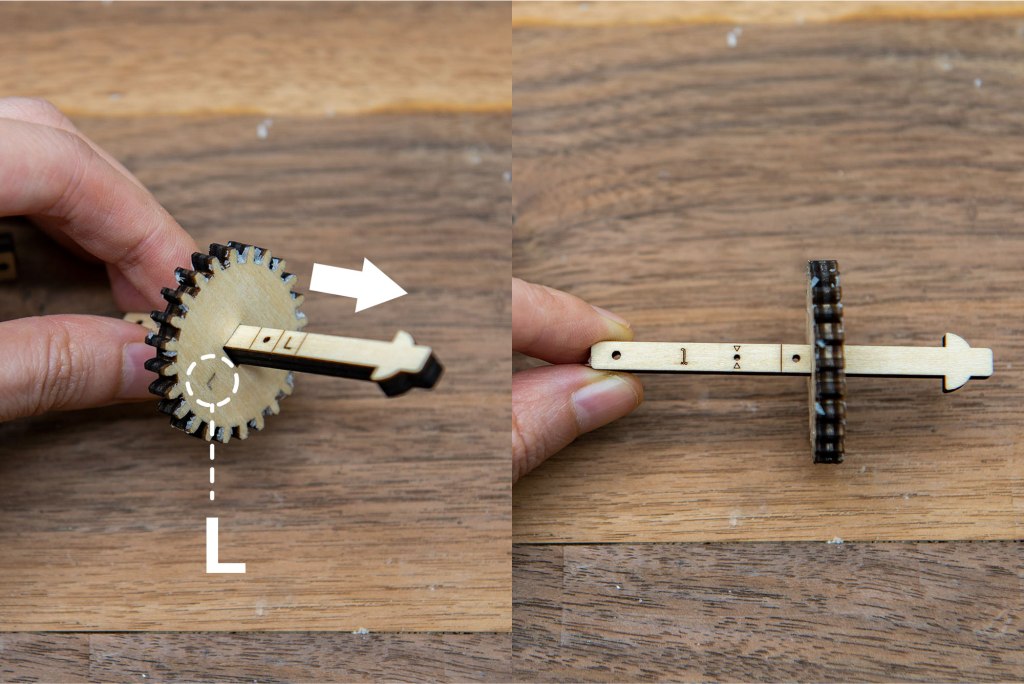
5/ 如上圖組裝兩個零件。
5/ Assemble the two parts as shown above.
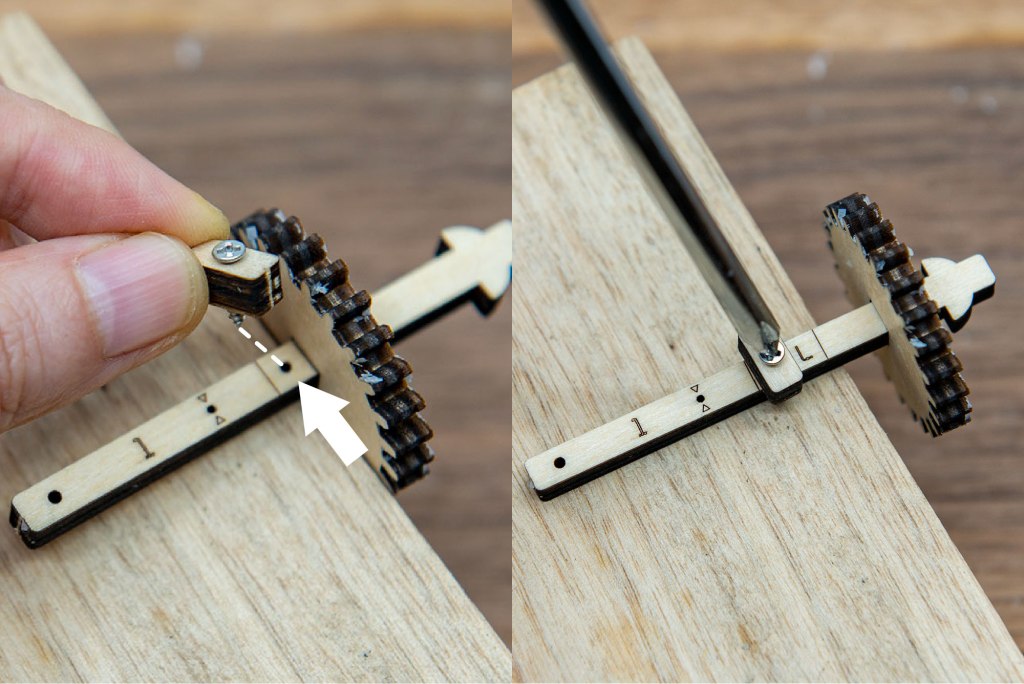
6/ 如上圖,在箭咀所示的位置以螺絲固定木零件。
6/ Tighten the wood component with screw at the area pointed by white arrow.
7/ 如上圖,在箭咀所示的位置以螺絲固定木零件。
7/ Tighten the wood component with screw at the area pointed by white arrow.
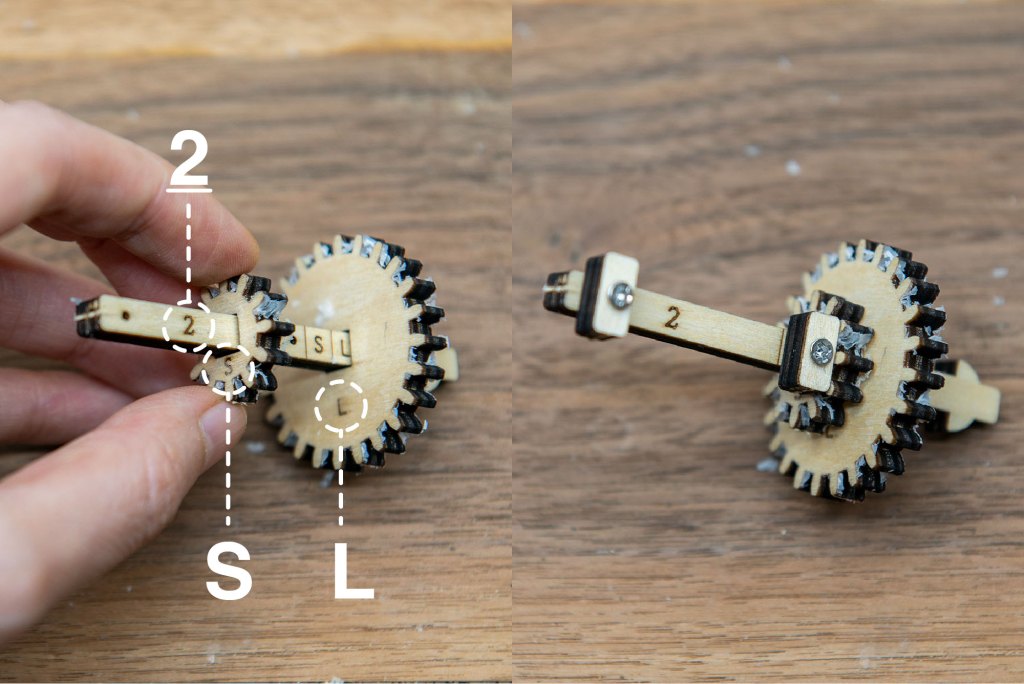
8/ 取出以上2號等零件 (S及L齒輪),如上圖用螺絲組裝。
8/ Take out No. 2 and other parts above (gear S & L), assemble them with screws as shown above.

9/ 取出以上3號等零件 (S及L齒輪),如上圖用螺絲組裝。
9/ Take out No. 3 and other parts above (gear S & L), assemble them with screws as shown above.
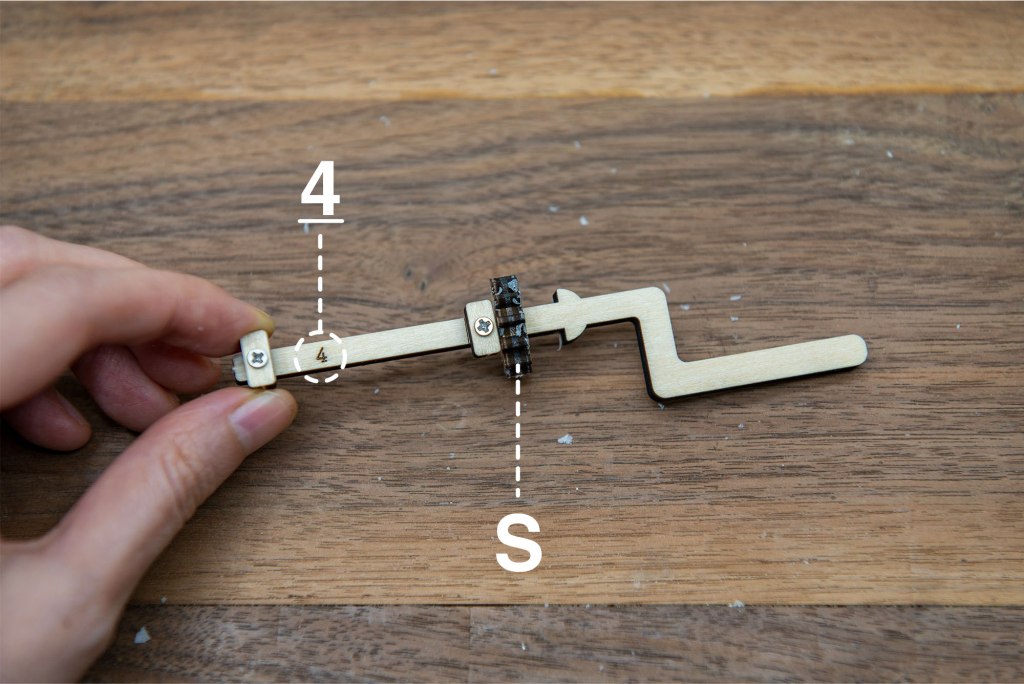
10/ 取出以上4號等零件 (S齒輪),如上圖用螺絲組裝。
10/ Take out No. 4 and other parts above (gear S), assemble them with screws as shown above.
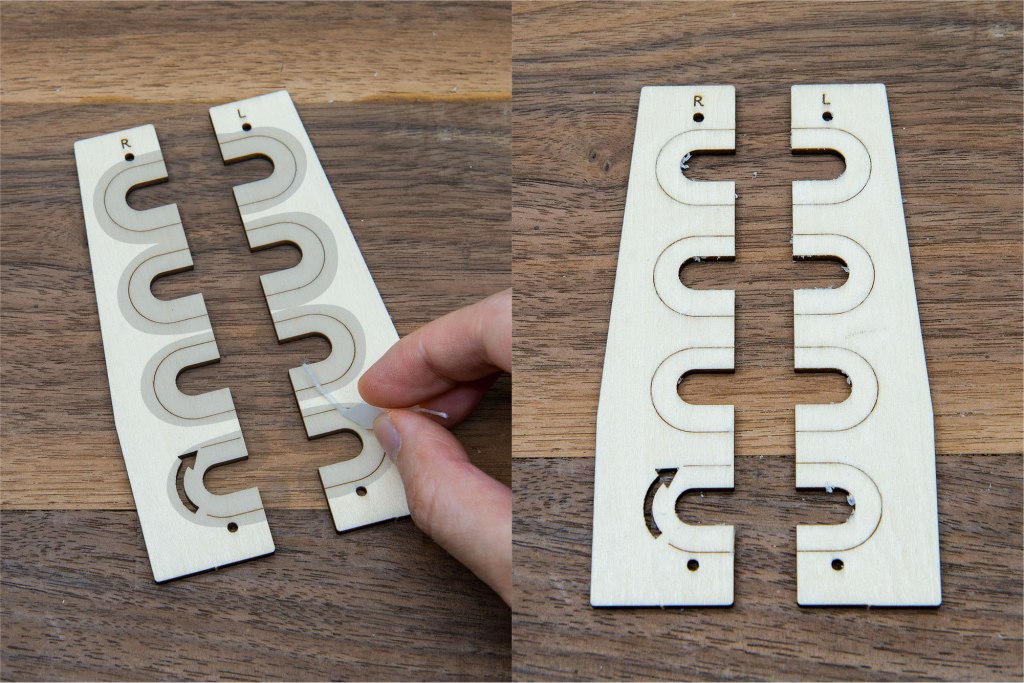
11/ 取出以上零件,有數字那面是正面。
11/ Take the above components out, the side with number engraved is the front side.
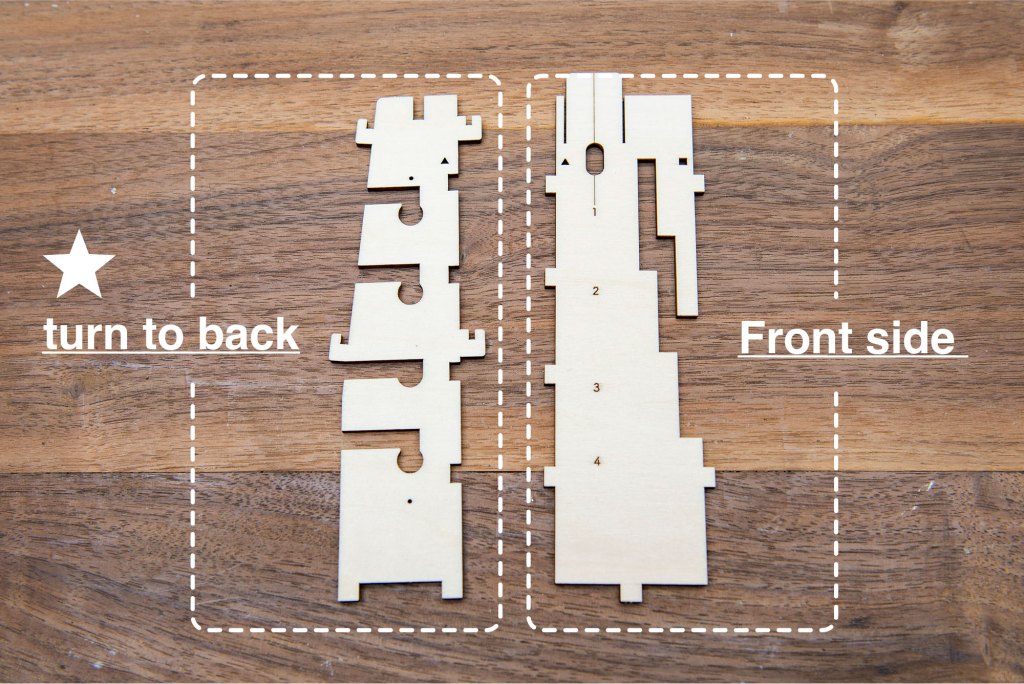
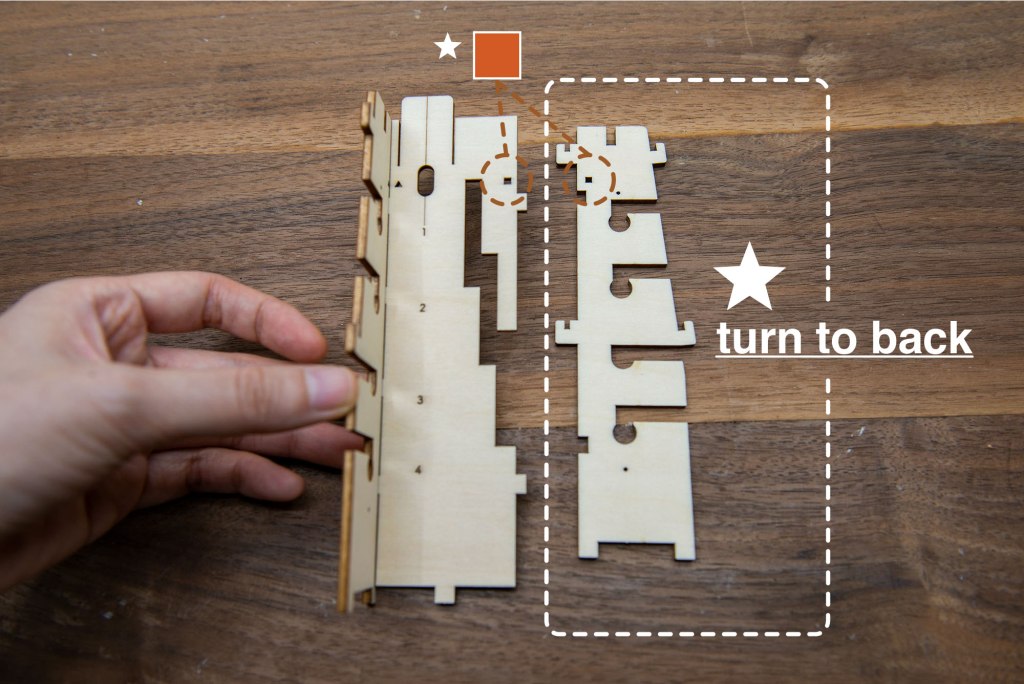
12/ 取出以上兩塊零件,圖左的零件反轉到背面。
12/ Take the above 2 components out, turn the left component to the back.
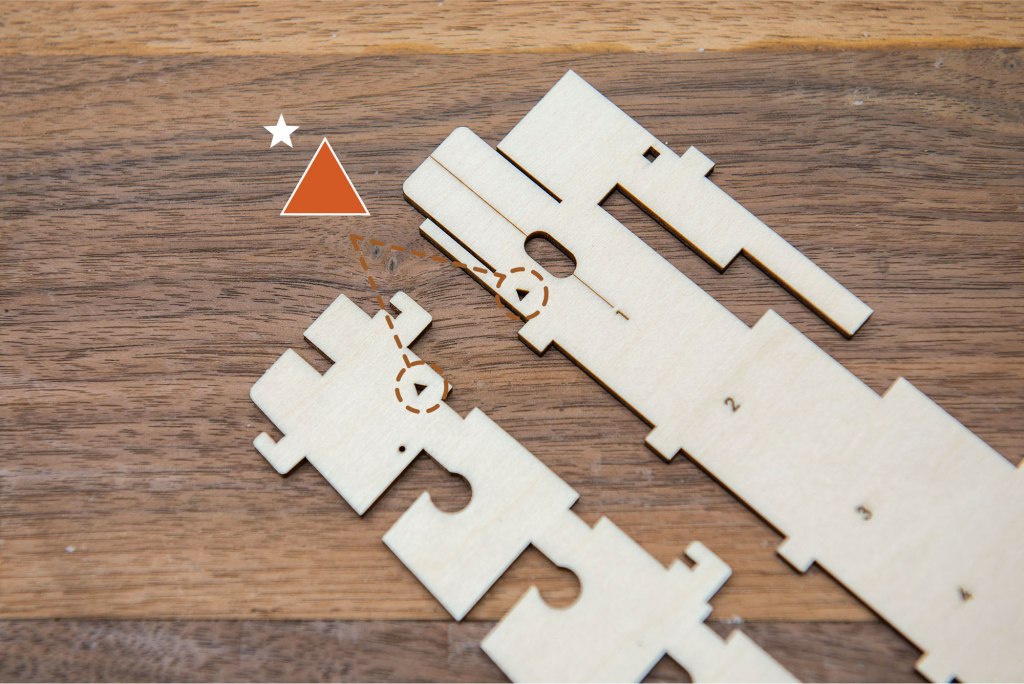
13/ 對準兩邊有三角形的位置。
13/ Align the 2 triangle sign.
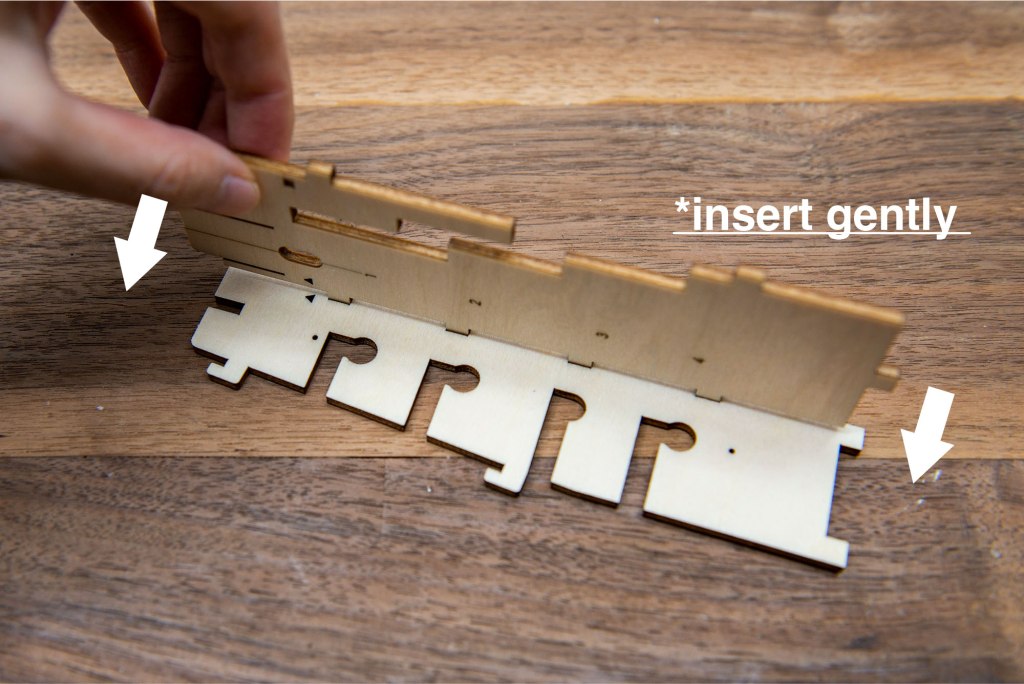
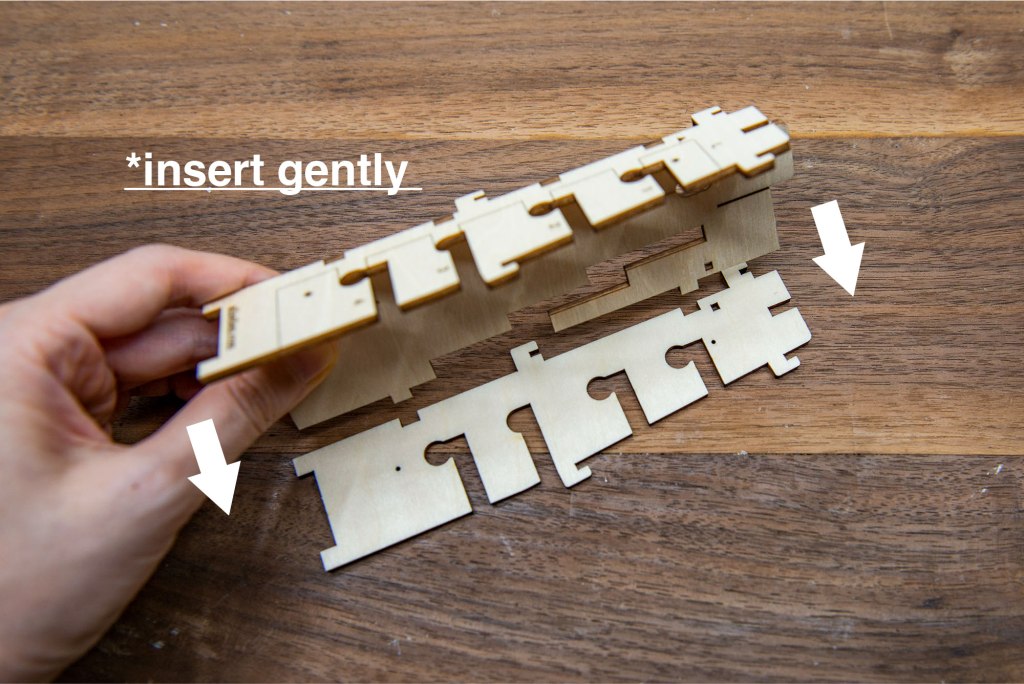
14/ 將兩塊木零件組裝在一起。
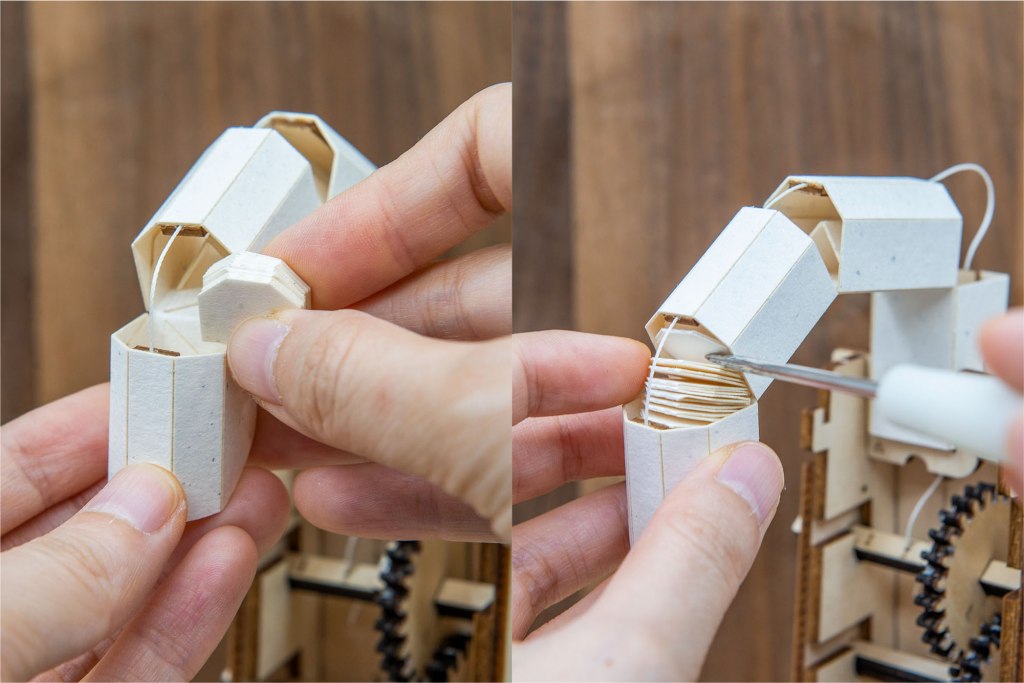
14/ Assemble the two wooden pieces together.
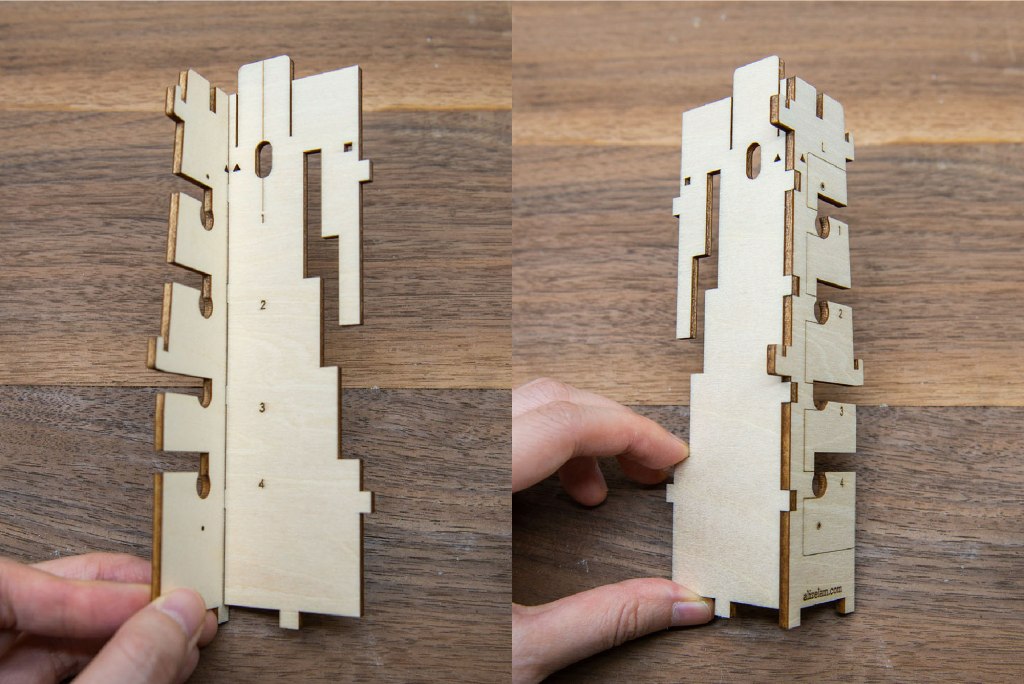
15/ 完成如上圖。
15/ Finished as shown above.
16/ 取出圖右的木零件,對準兩邊的正方形圖案。
16/ Take the above component out, turn the right component to the back and align the 2 square sign.
17/ 將兩組木零件組裝在一起。
17/ Assemble the two wooden parts together.
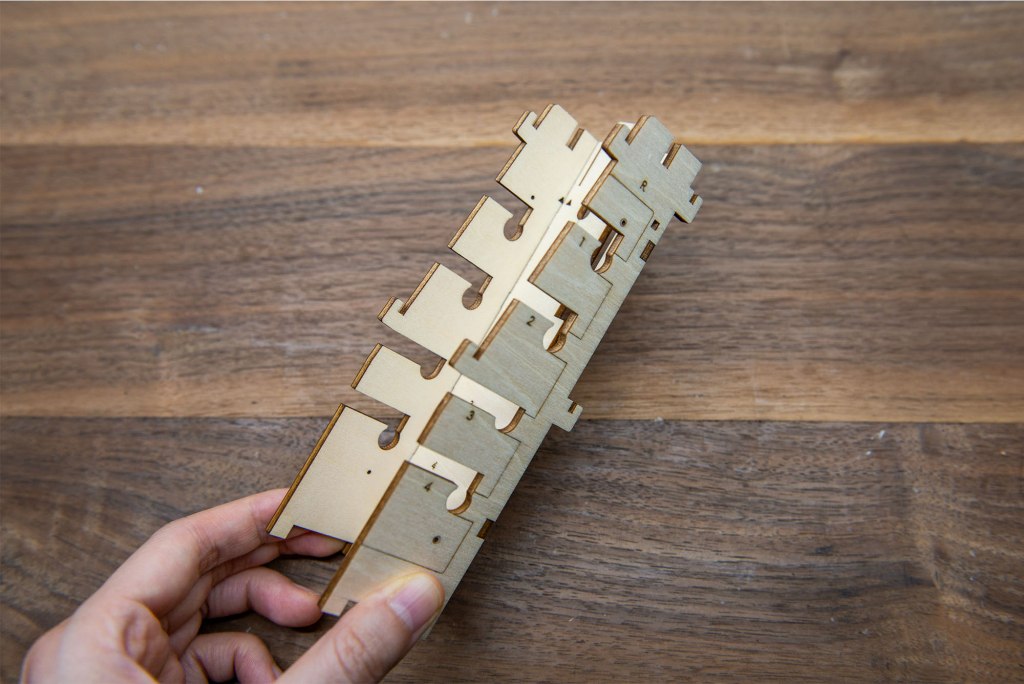
18/ 如成圖如上。
18/ Finished as shown above.
19/ 取出以上兩塊木零件,在圖右的圓木片上塗上適量木工膠水。
19/ Take the above 2 components out, apply wood glue on the wood component indicated in the right picture.
20/ 黏上木零件,在圖右的長方形孔內加入適量木工膠水。
20/ Glue the wooden parts as the left picture, add some glue into the rectangular holes shown in the right picture.
21/ 將上圖兩個木零件組裝在一起,清理多出的膠水。
21/ Assemble the two parts in the picture above and clean off the excess glue.
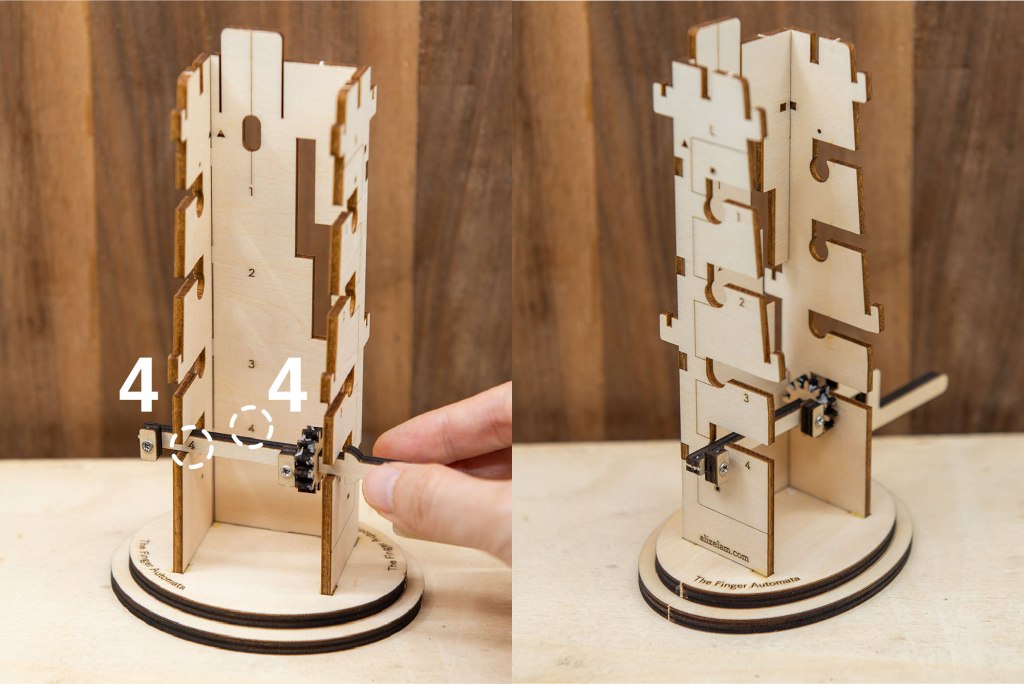
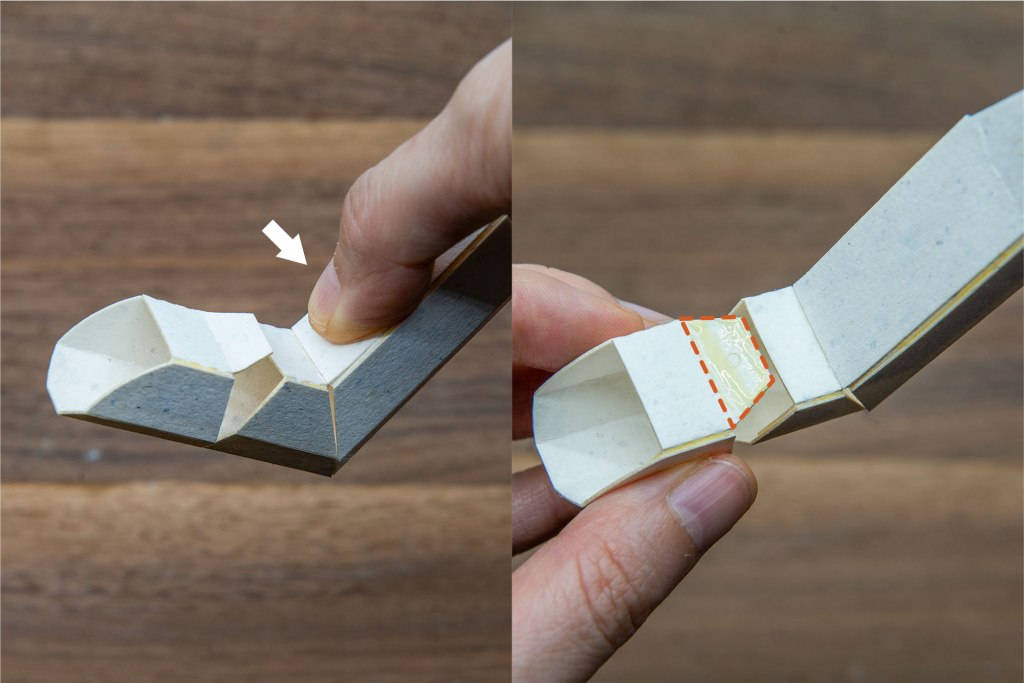
22/ 在4號的位置,安裝上組裝好的4號零件。
22/ Install the assembled No. 4 parts as shown above.
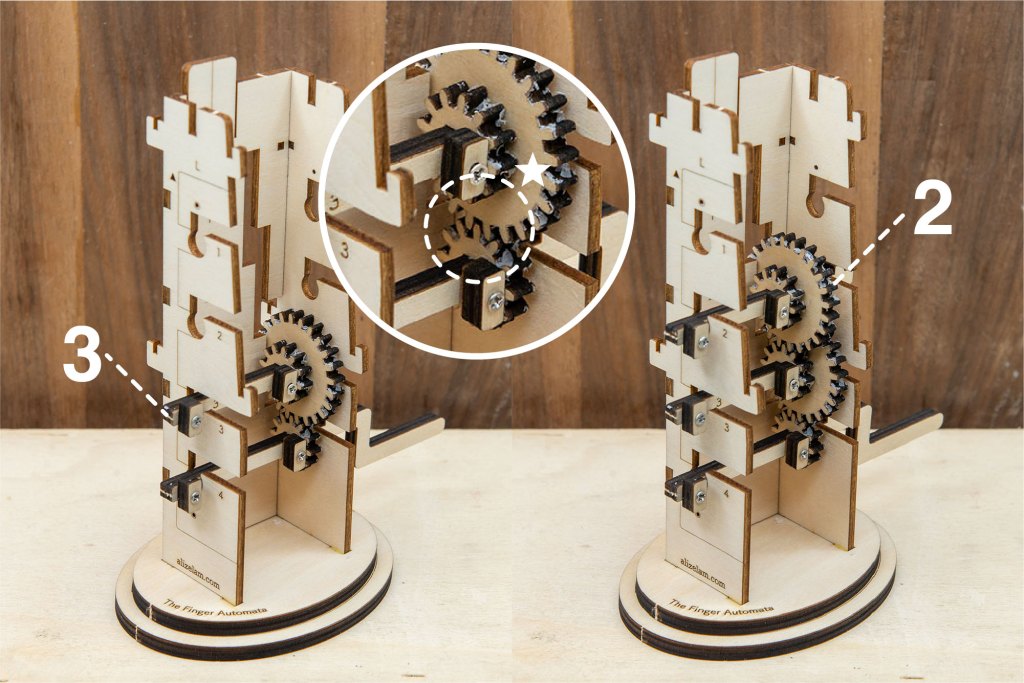
23/ 裝上3號、然後2號零件,請檢查齒輪是否有扣在一起。
23/ Install No. 3 parts, then No. 2, make sure the gears are locked together.

24/ 最後,在上圖的位置裝上1號零件。
24/ Install part No. 1 in the position shown above.
25/ 取出以上零件和小蠟燭。
25/ Take the above components out, including wax.
26/ 在上圖灰色陰影位置塗上蠟。
26/ Apply wax on the above shadowed area.
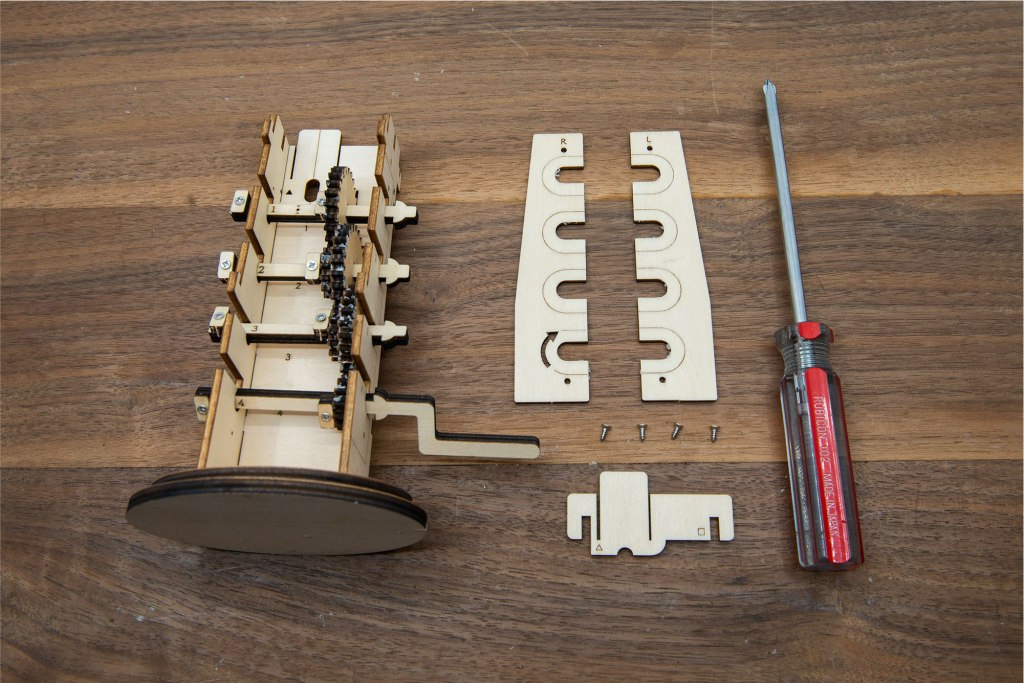
27/ 取出以上零件、螺絲、螺絲批。
27/ Take out the above parts, screws and screwdriver.
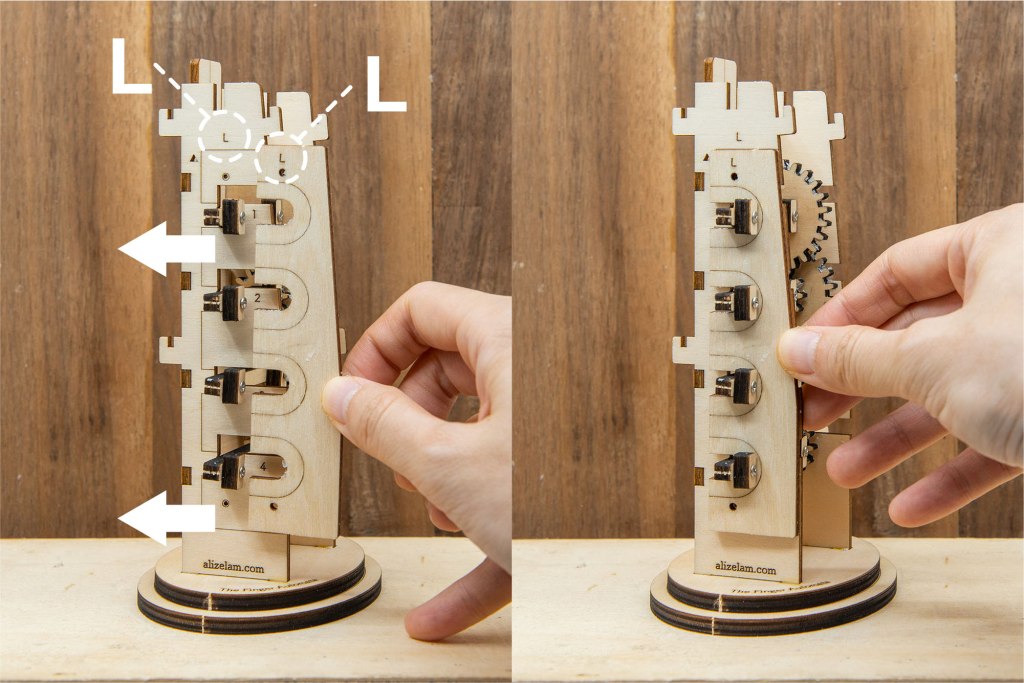
28/ 將L字零件對準主機身上的L字。
28/ Align parts L with the letter L on the main body.
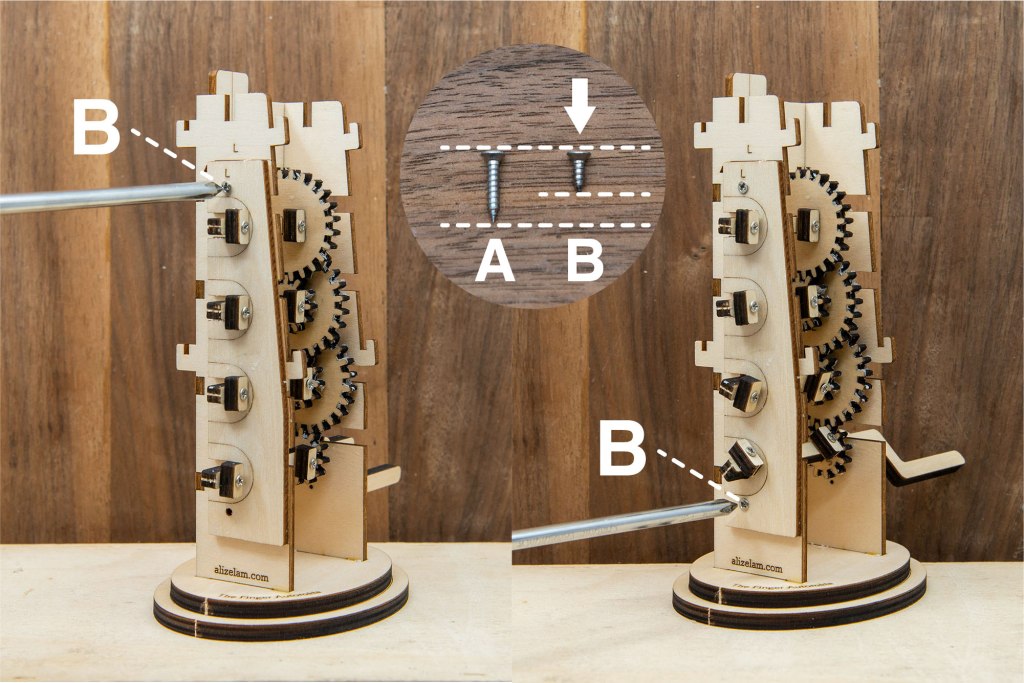
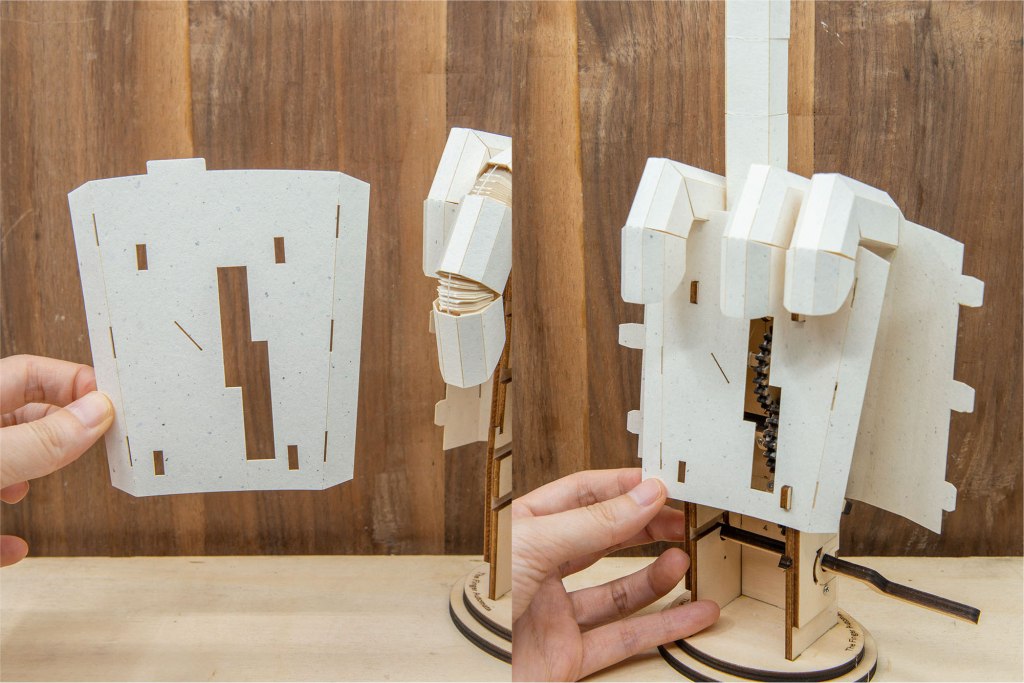
29/ 對準L的位置,上下用兩粒B螺絲固定。
29/ Tighten 2 screw B in the indicated area.
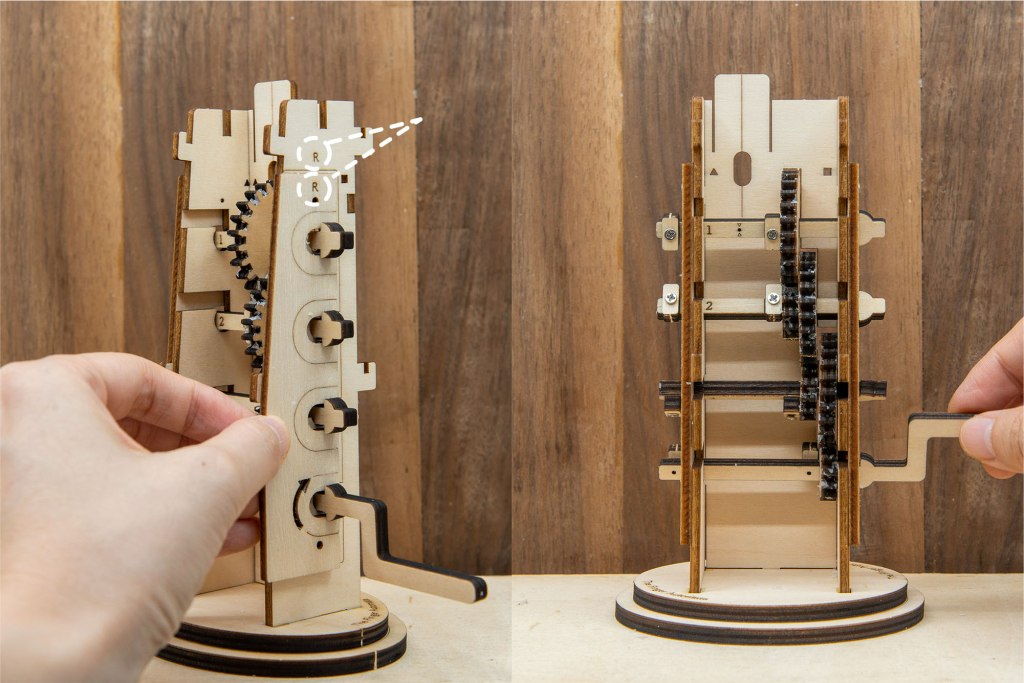
30/ 另一邊R字零件也是用樣做法,用2粒B螺絲固定。
30/ Repeat the same procedure on the other side, tighten parts R with 2 screw B.
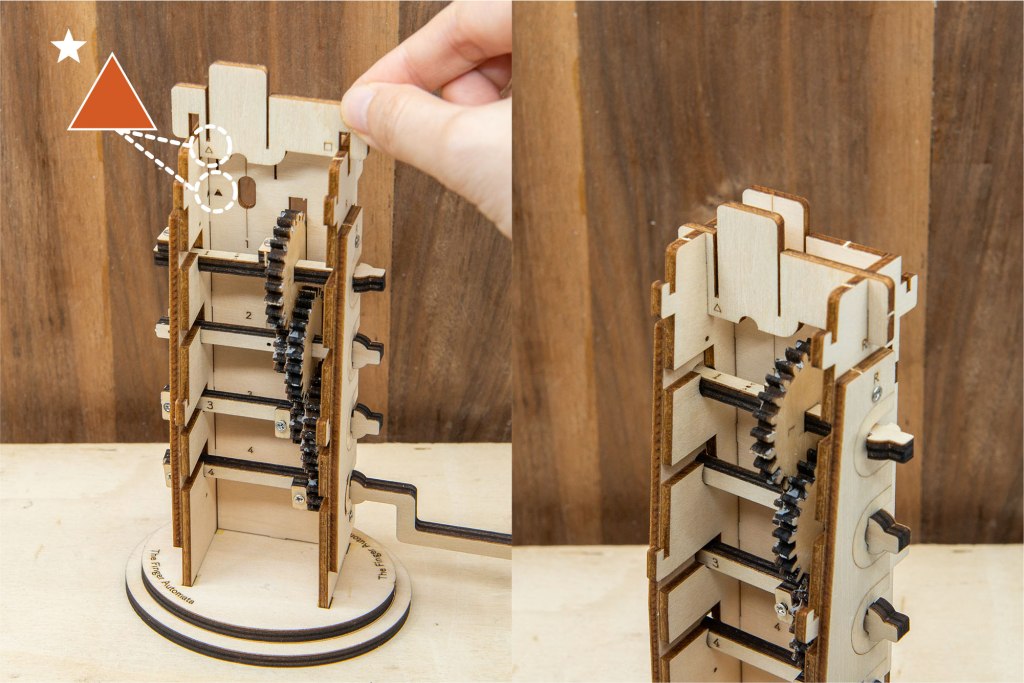
31/ 對準兩個三角形圖案,安裝上圖的零件。
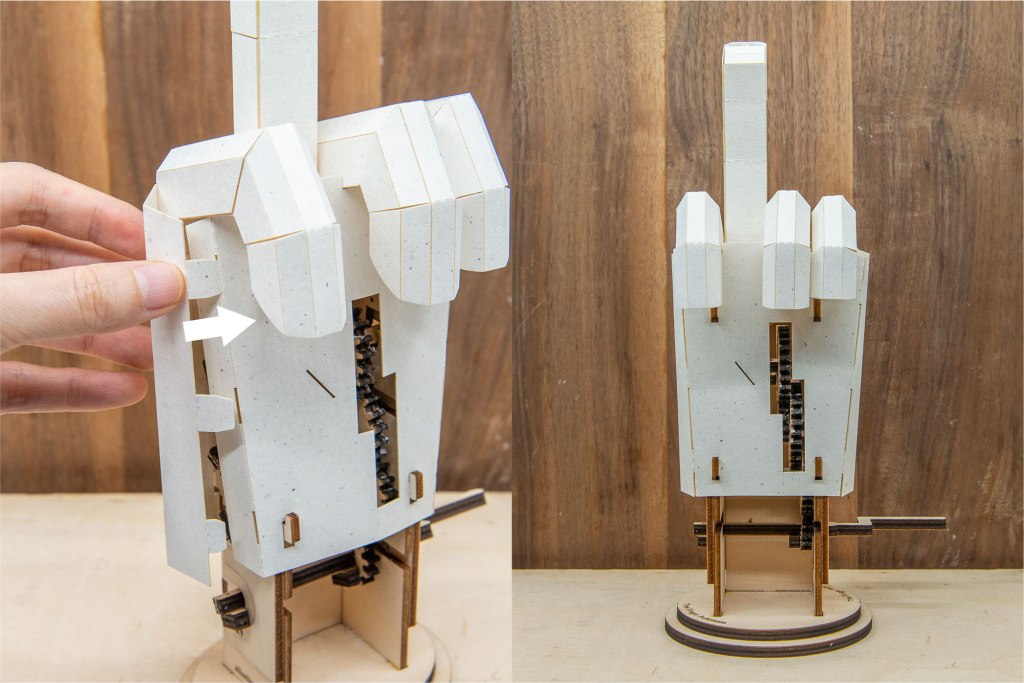
31/ Align the two triangle signs and install the parts in the picture above.
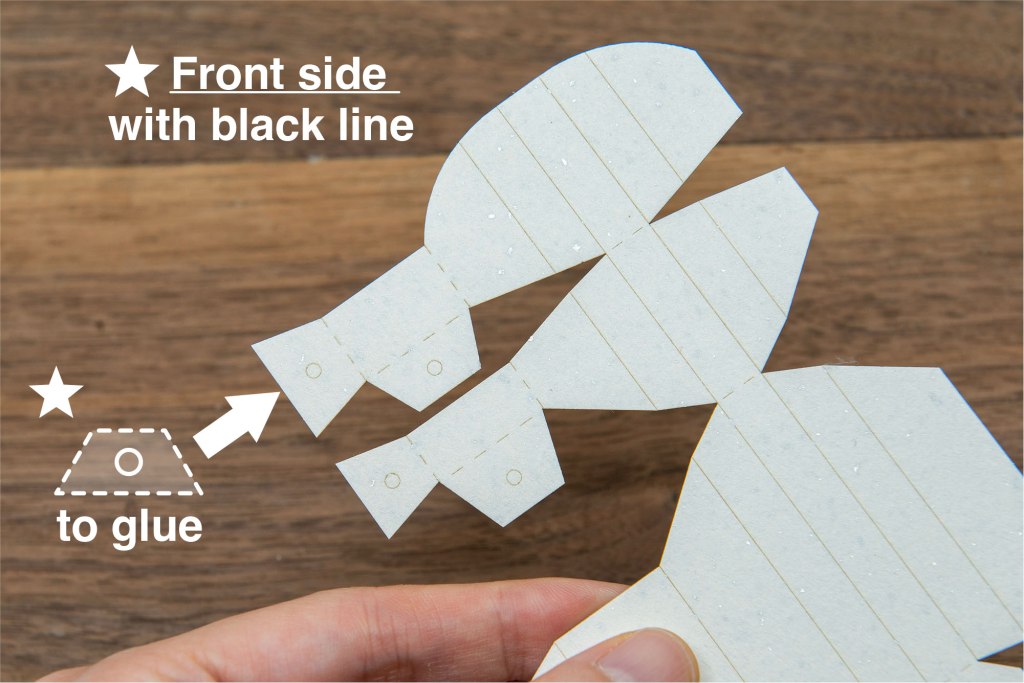
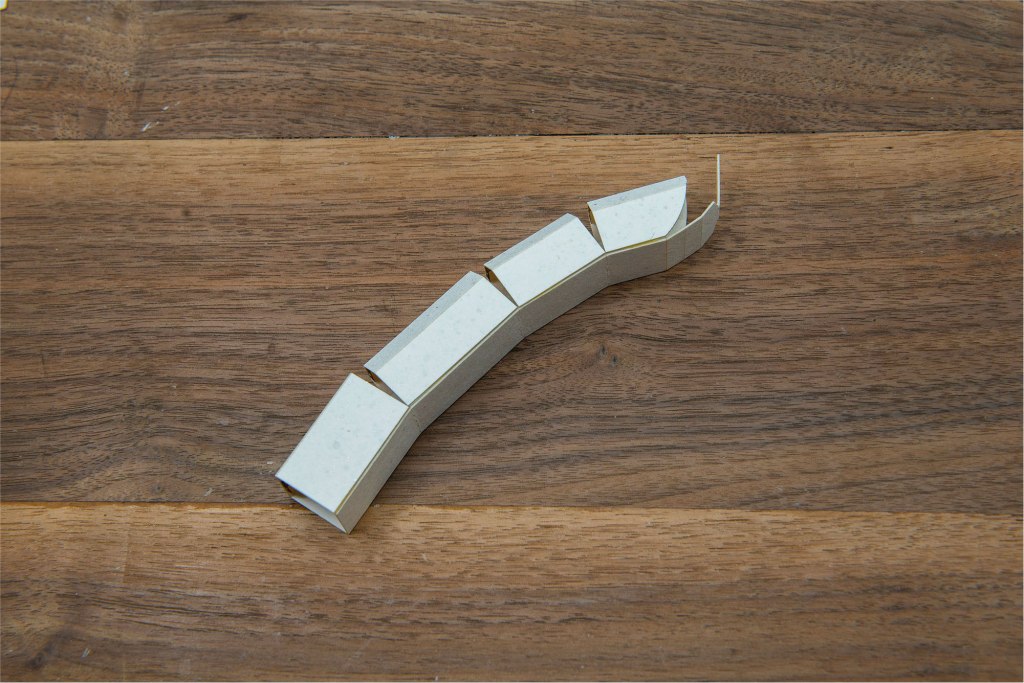
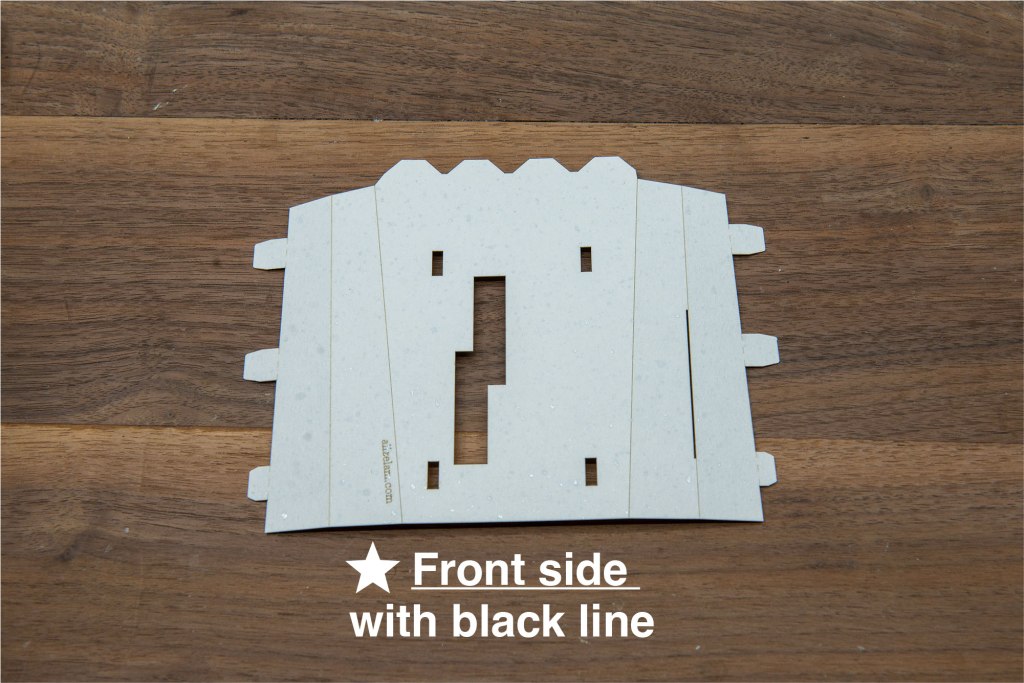
32/ 取出紙零件,有黑色線那面是正面,有圓形圖案的是塗膠水的位置。
32/ Take out the paper parts. The side with the black line is the front side, and the side with the circular pattern is where the glue should be applied.
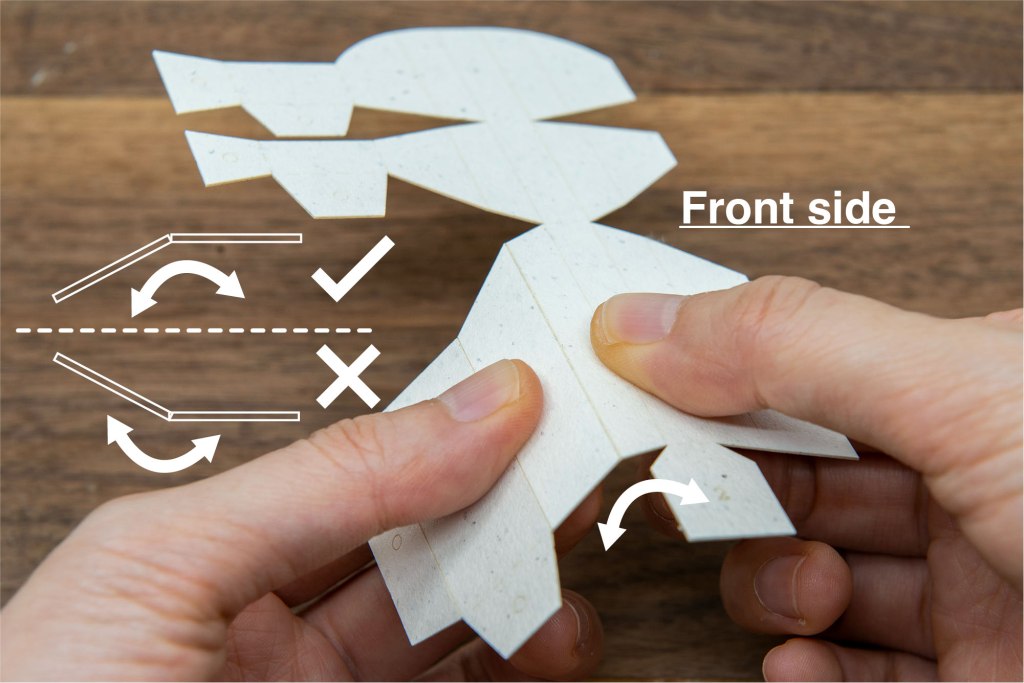
33/ 正面的黑色壓線請向下屈摺,不要反方向向上屈摺。
33/ Please bend the black line downwards.
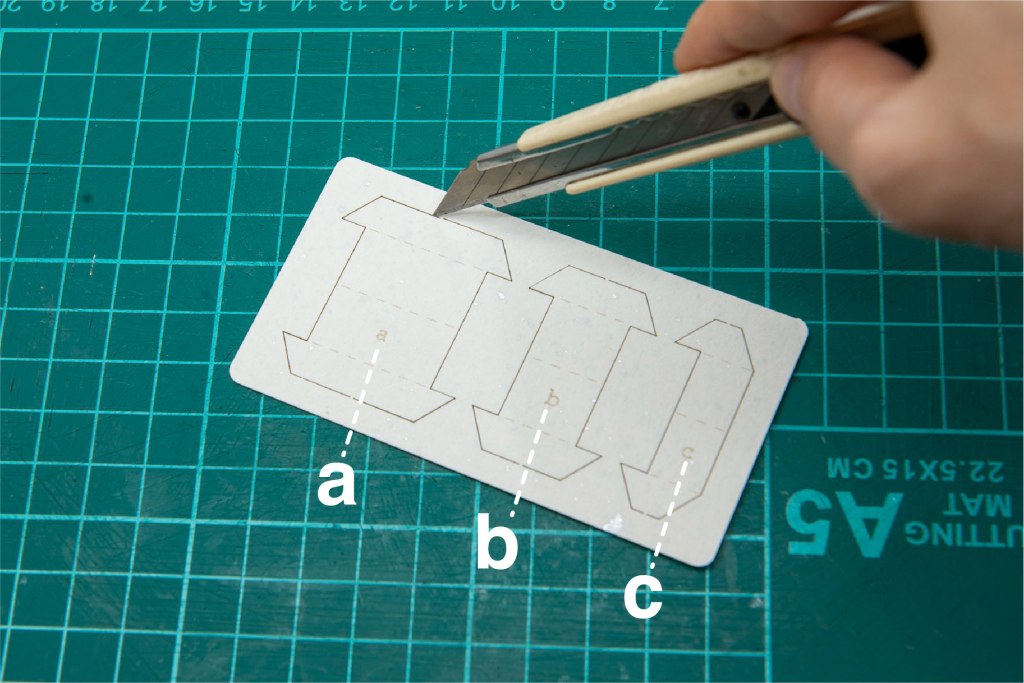
34/ 取出以上紙零件,留意區分a,b和c零件。
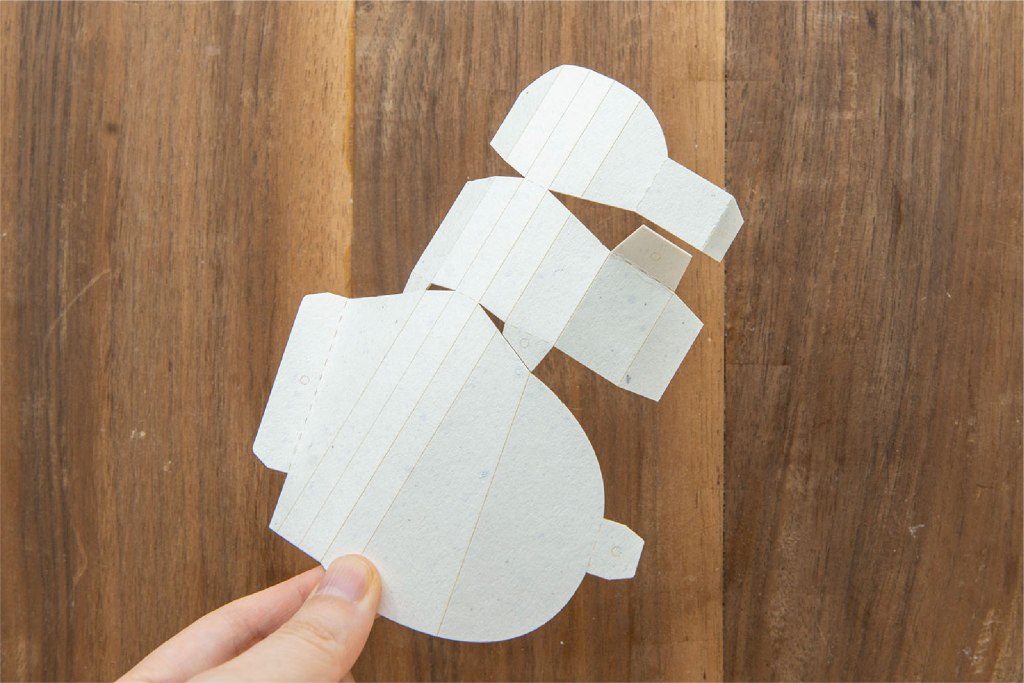
34/ Take the above component out.
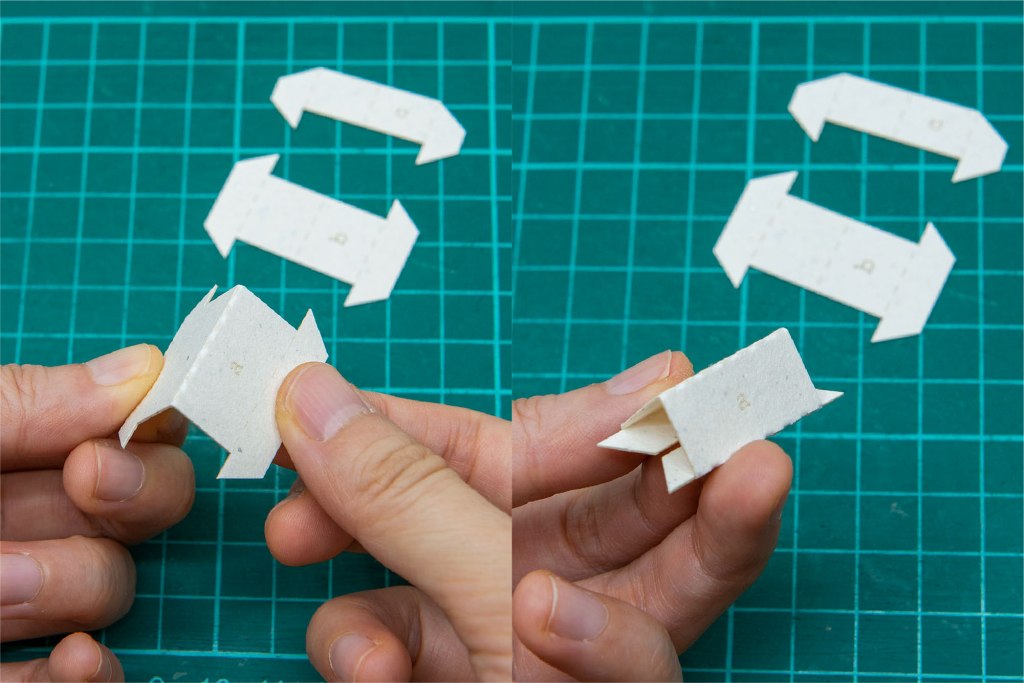
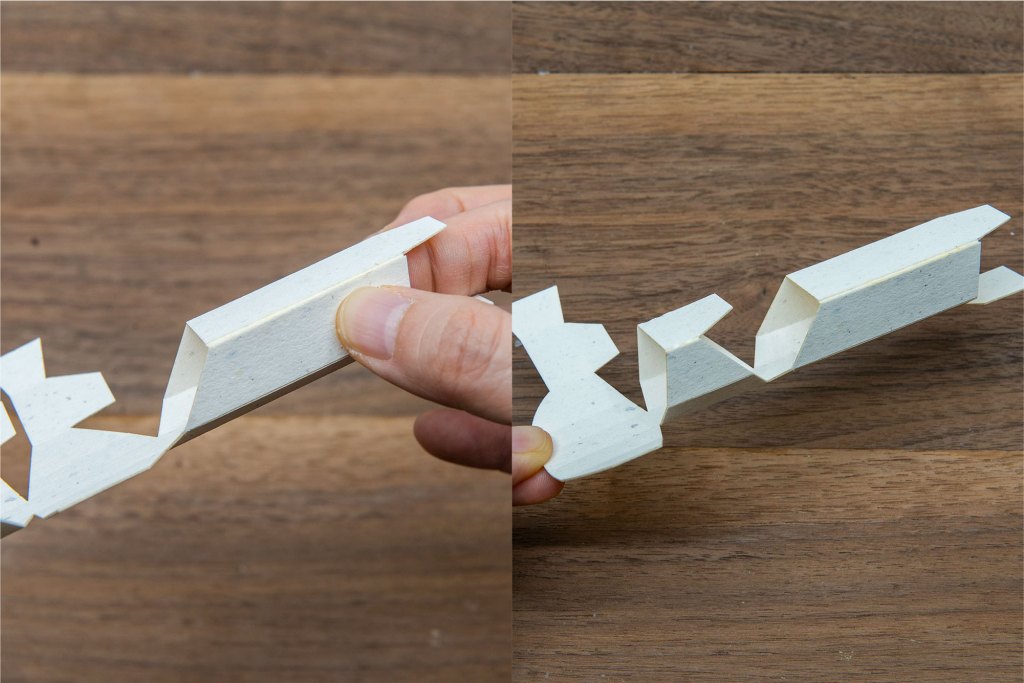
35/ 如上圖屈摺紙零件成三角形。
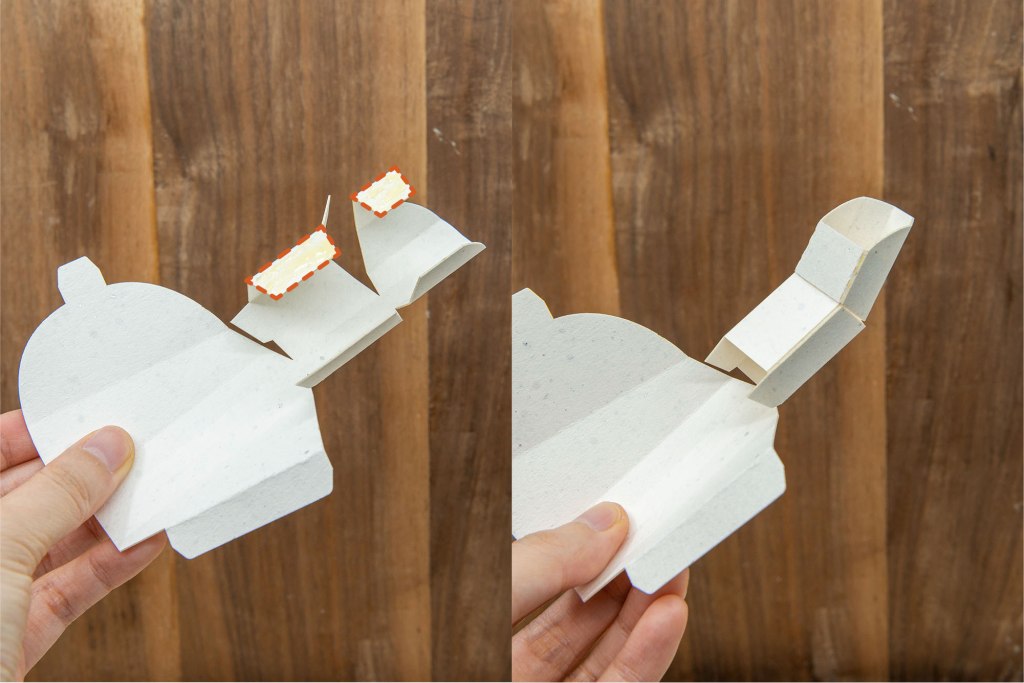
35/ Fold the paper parts to triangle shape as shown above.
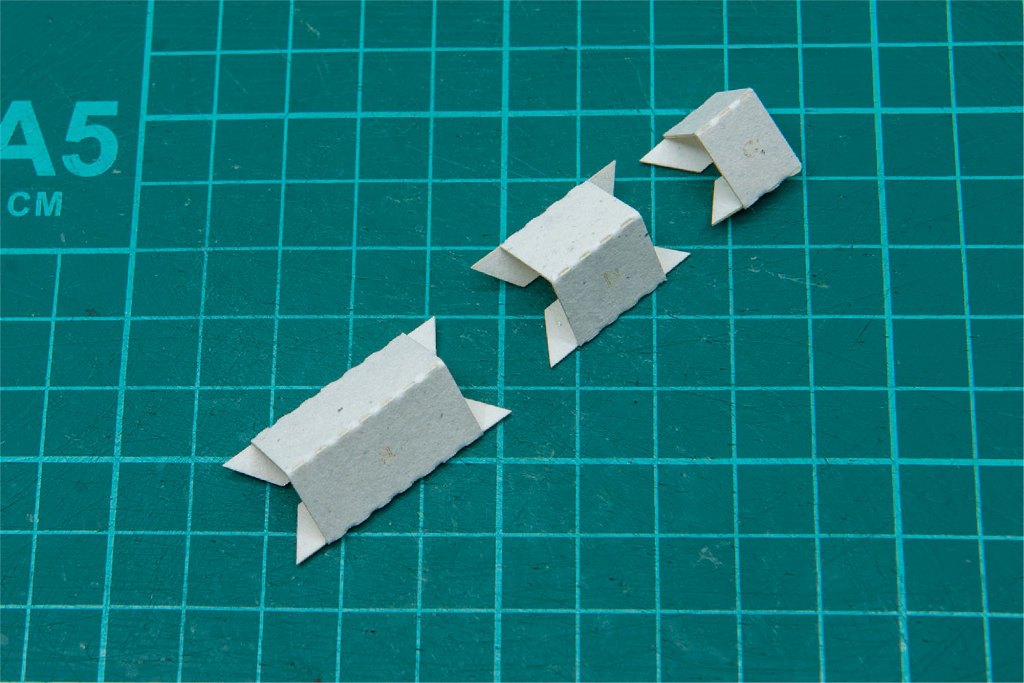
36/ 完成圖如上。
36/ Finished as shown above.
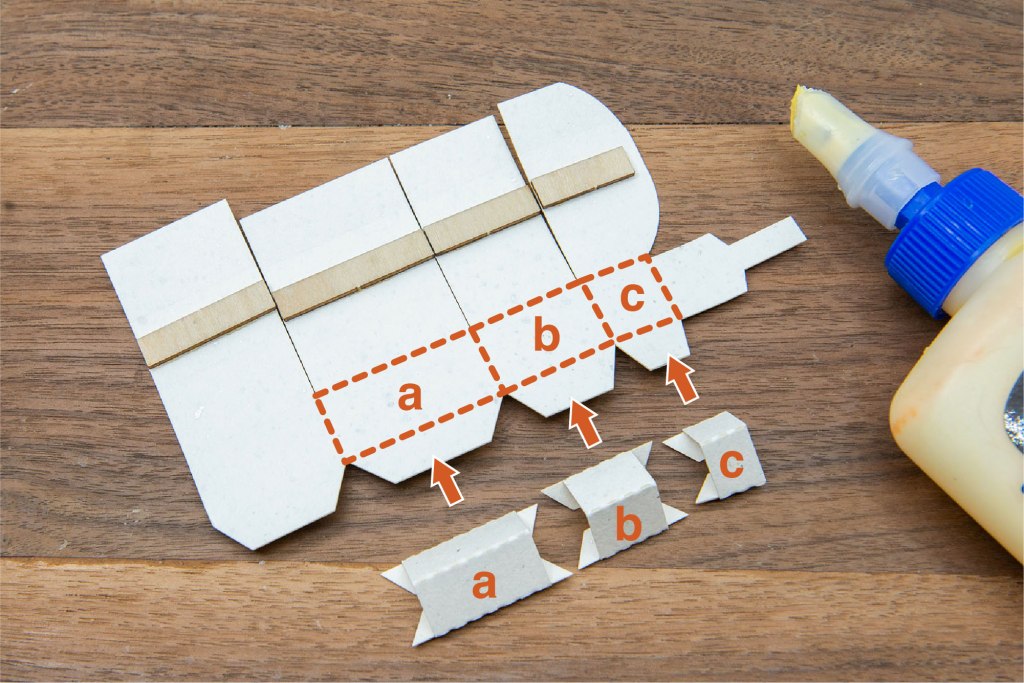
37/ 將a,b和c零件,用木工膠水固定到對應的虛線位置。

38/ 在a,b,c零件的底部塗上木工膠水,貼上對應的位置。
38/ Apply wood glue on the bottom of parts a, b, and c, glue them to the corresponding positions.
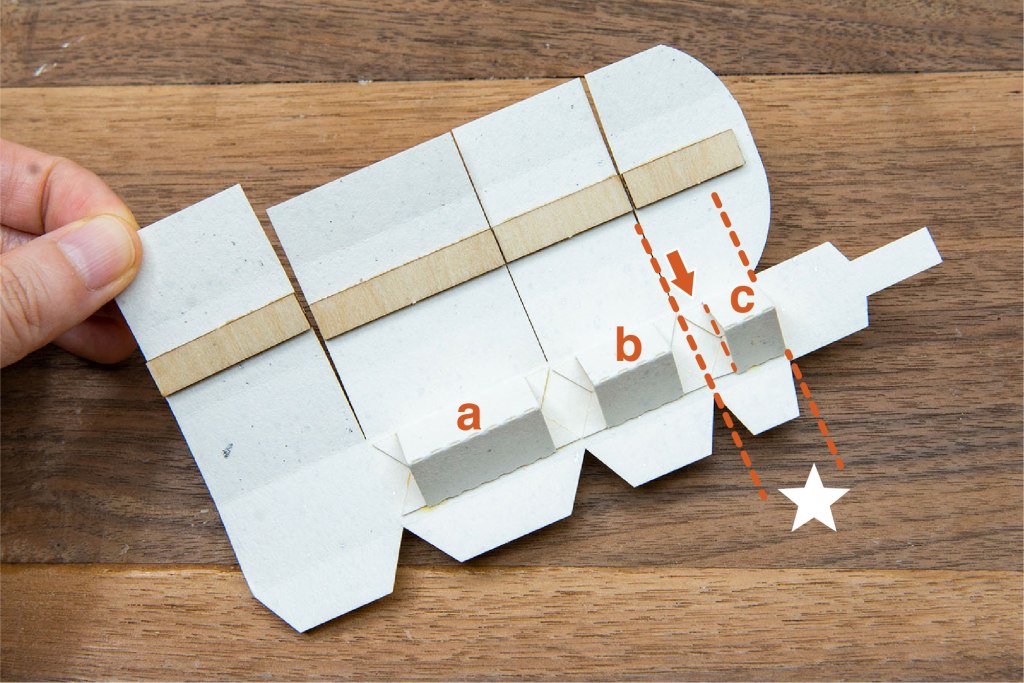
39/ 注意C號零件前後的方向。
39/ Pay attention to the direction of part C.
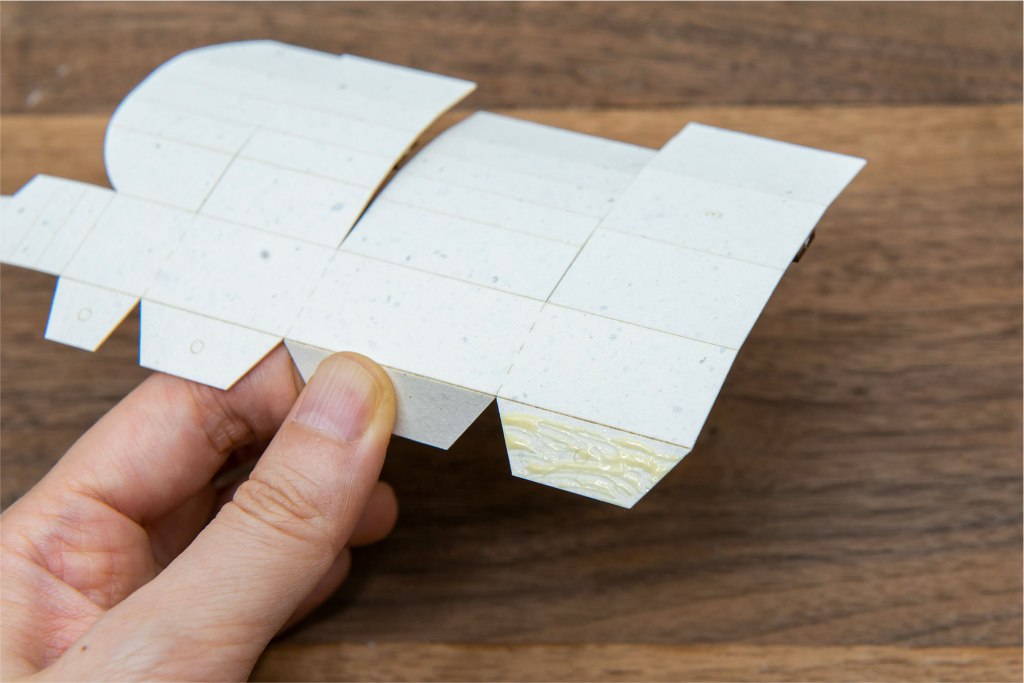
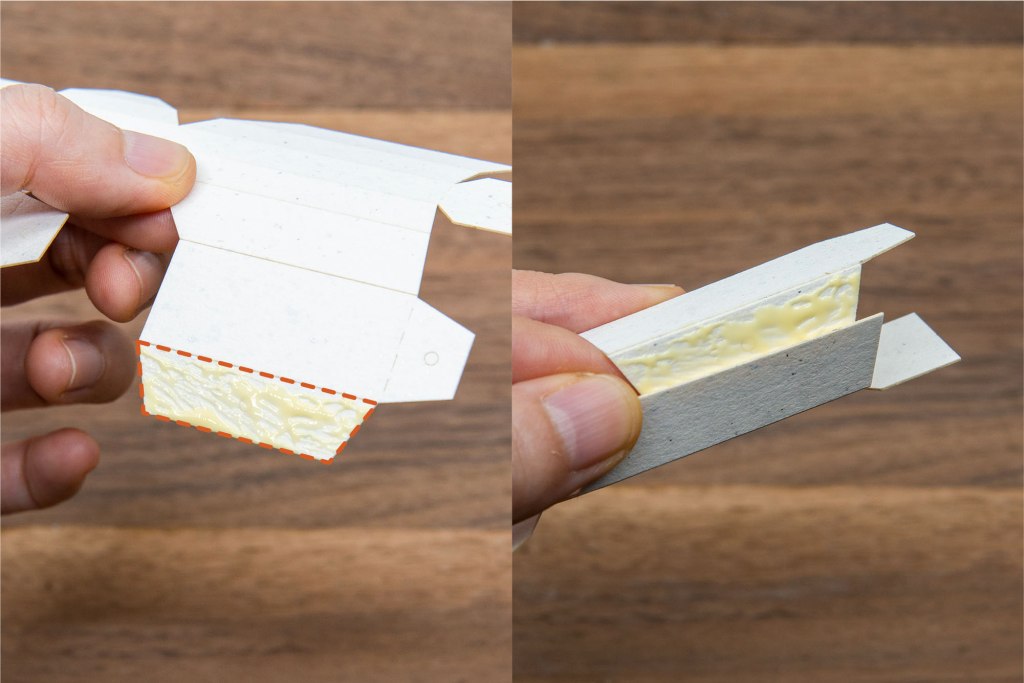
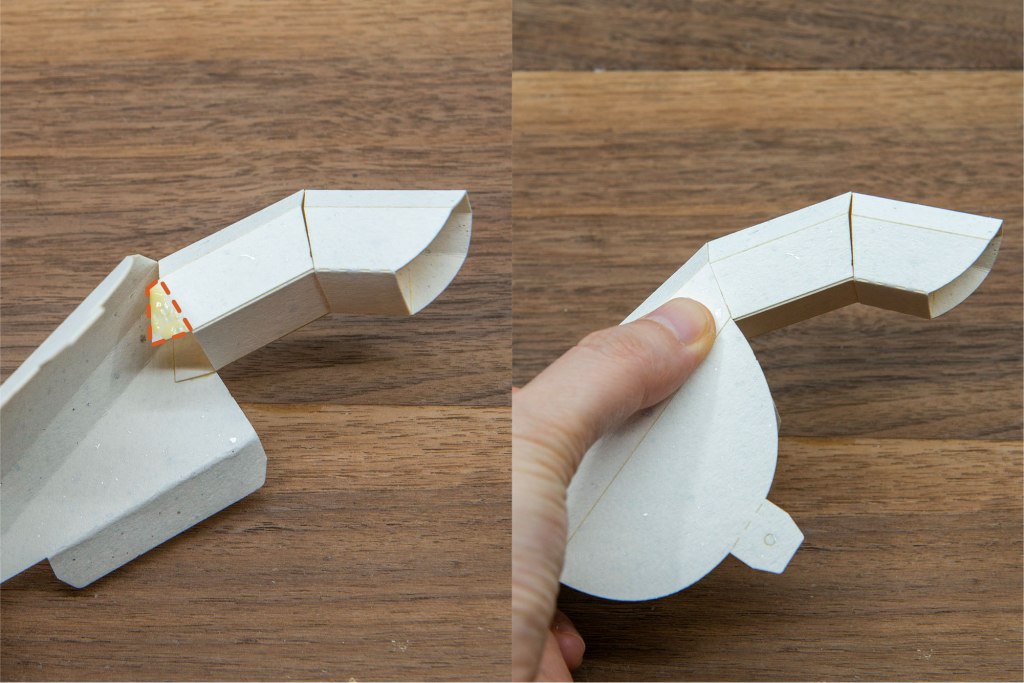
40/ 在上圖的位置塗上木工膠水。
40/ Apply wood glue on the area shown above.

41/ 摺成方筒形,有膠水的接駁位置輕按10秒左右固定。
41/ Fold it into a square tube shape ,press lightly on the glued joint for about 10 seconds, let dry.
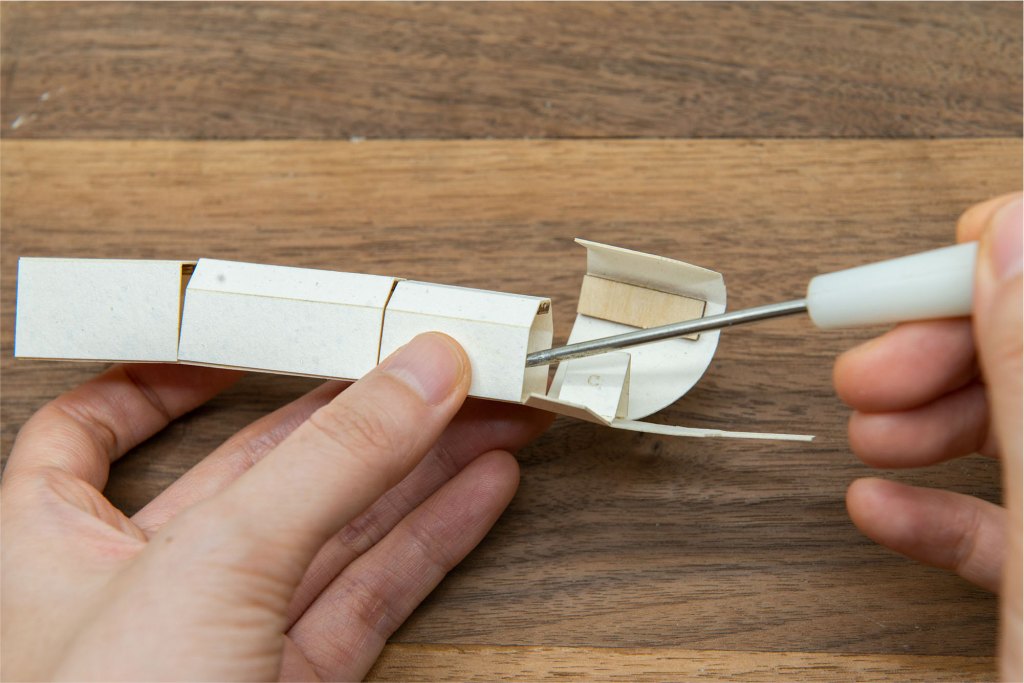
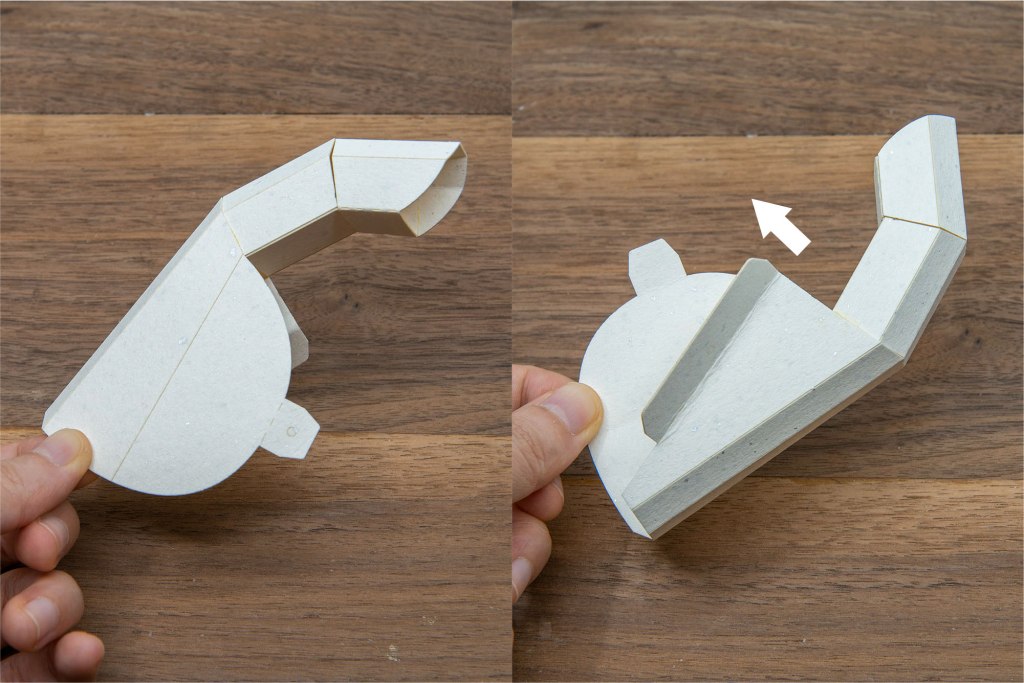
42/ 另外三格 (a,b &c) 也是同樣做法,可用錐幫忙固定接駁位。
42/ Repeat the same procedure on a, b and c, bradawl could be use to help holding the joint.
43/ 完成圖如上。
43/ Finished as show above.
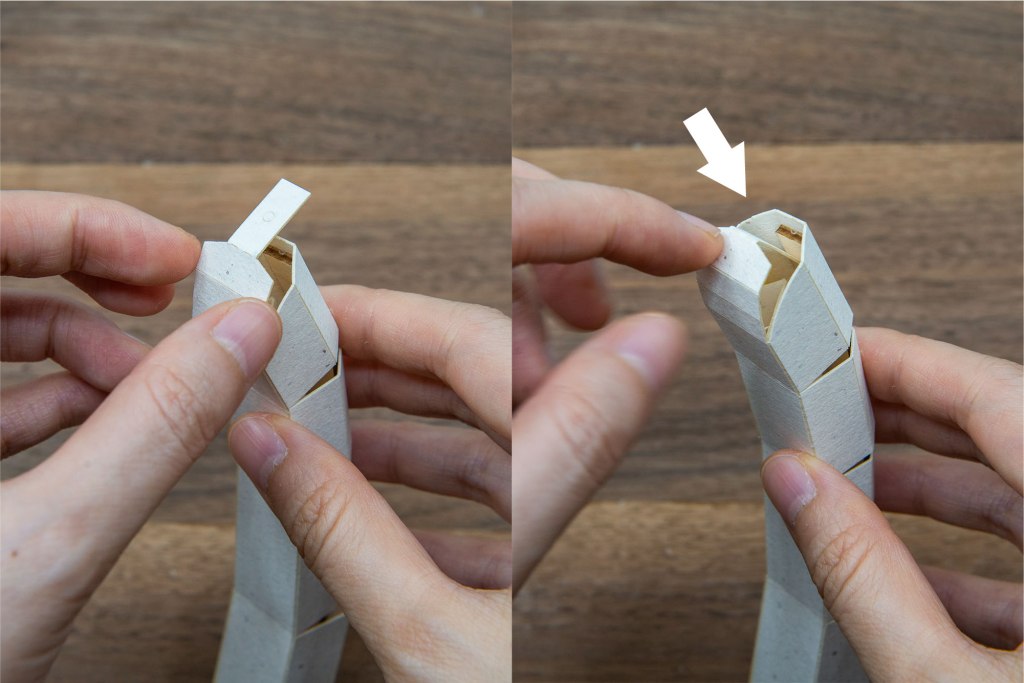
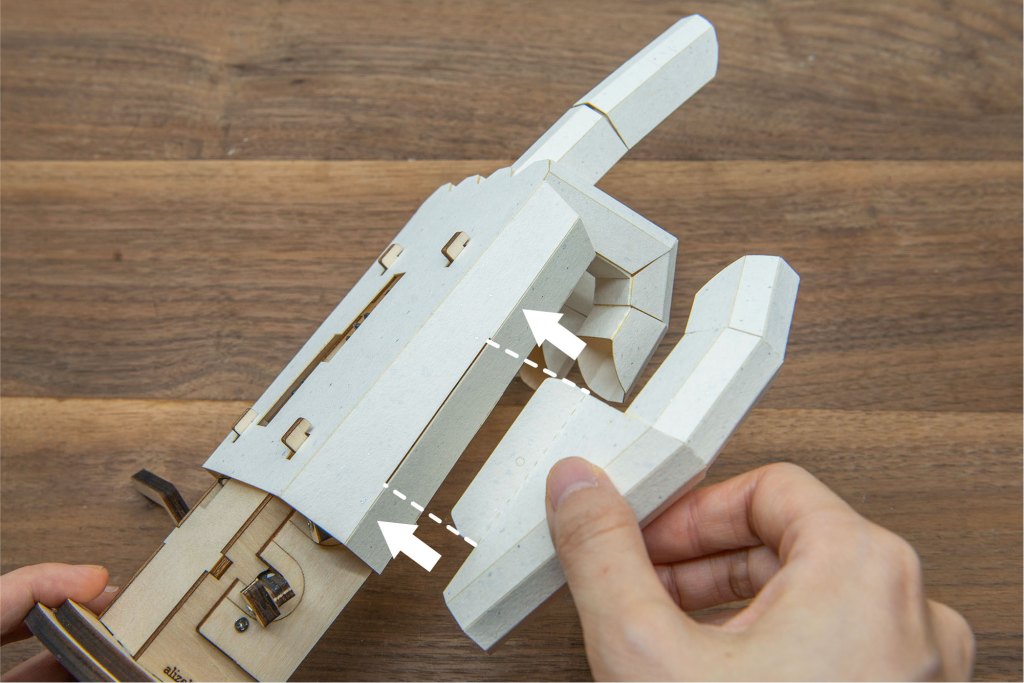
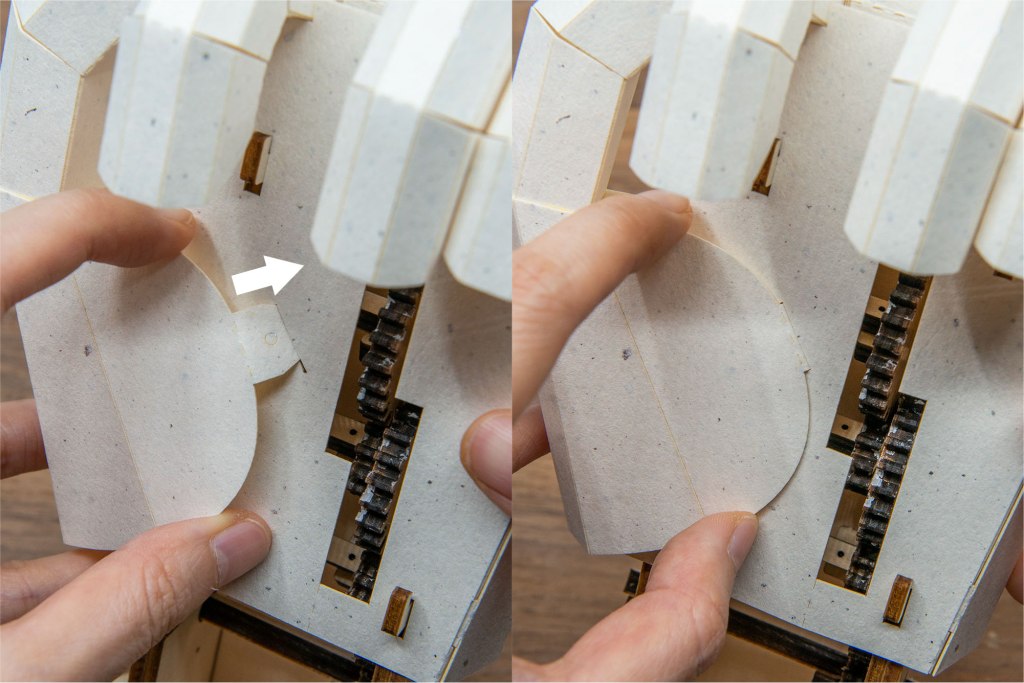
44/ 手指點部份如上圖處理。
44/ The finger pointing part is processed as shown above.
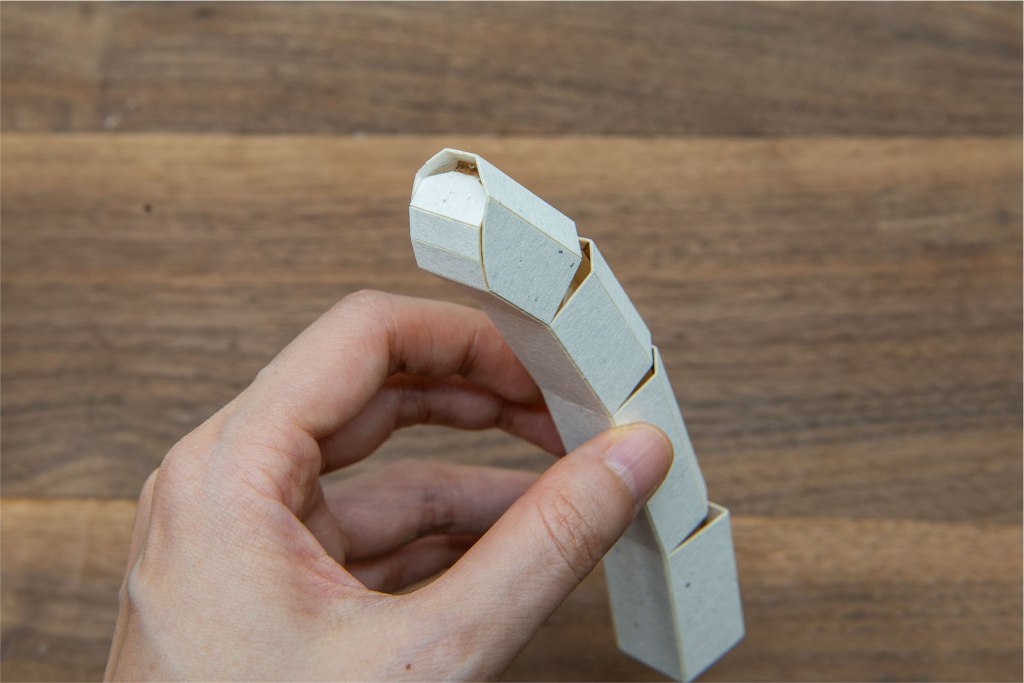
45/ 完成圖如上。
45/ Finished as shown above.
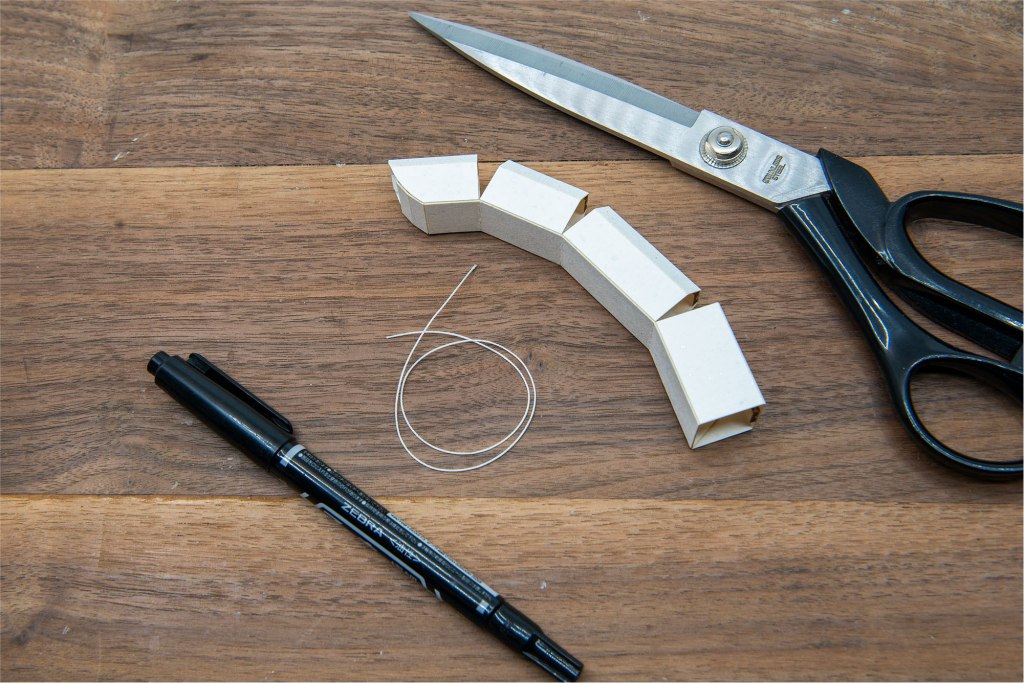
46/ 取出以上材料和工具。
46/ Take out the above components and tools.
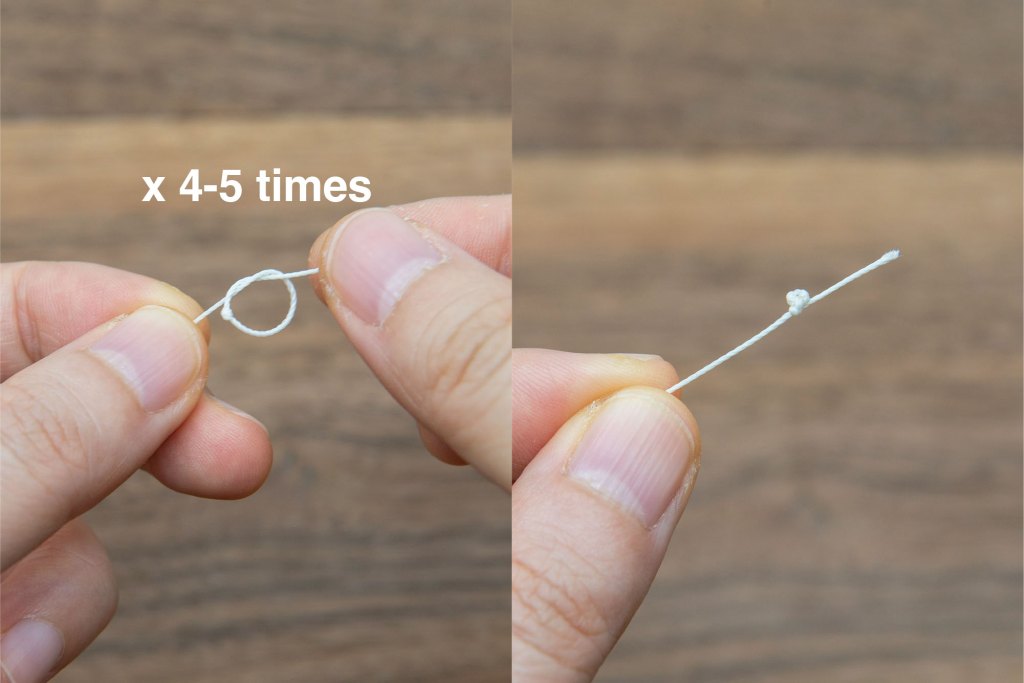
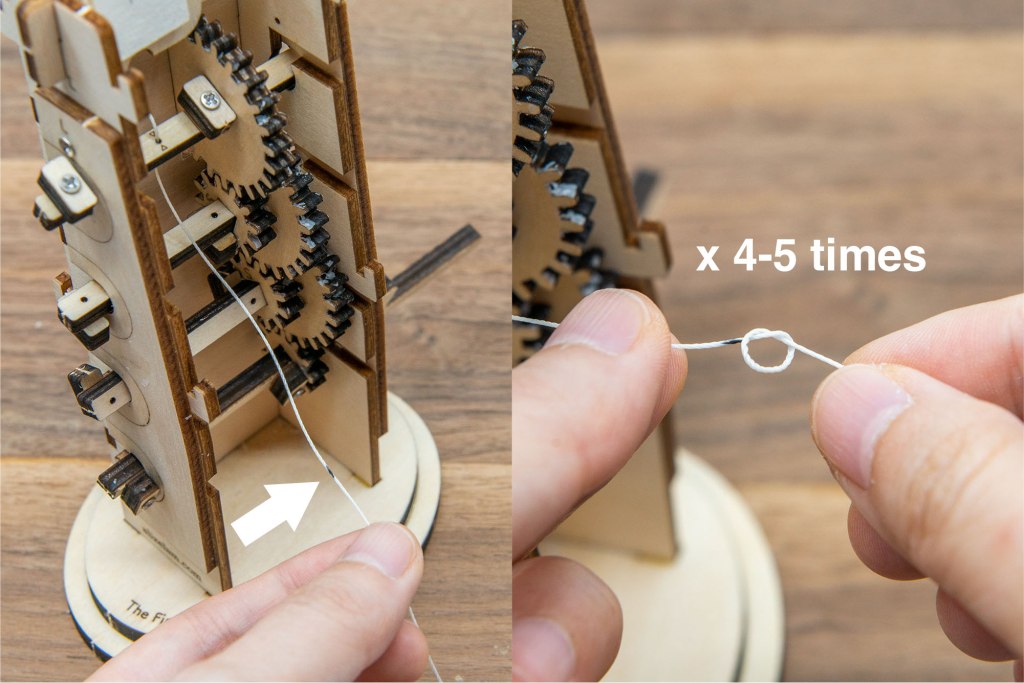
47/ 在繩尾同一位置重覆打4-5個結,形成一個大結。
47/ Repeatedly tie 4-5 knots at the end of the rope to form a big knot.
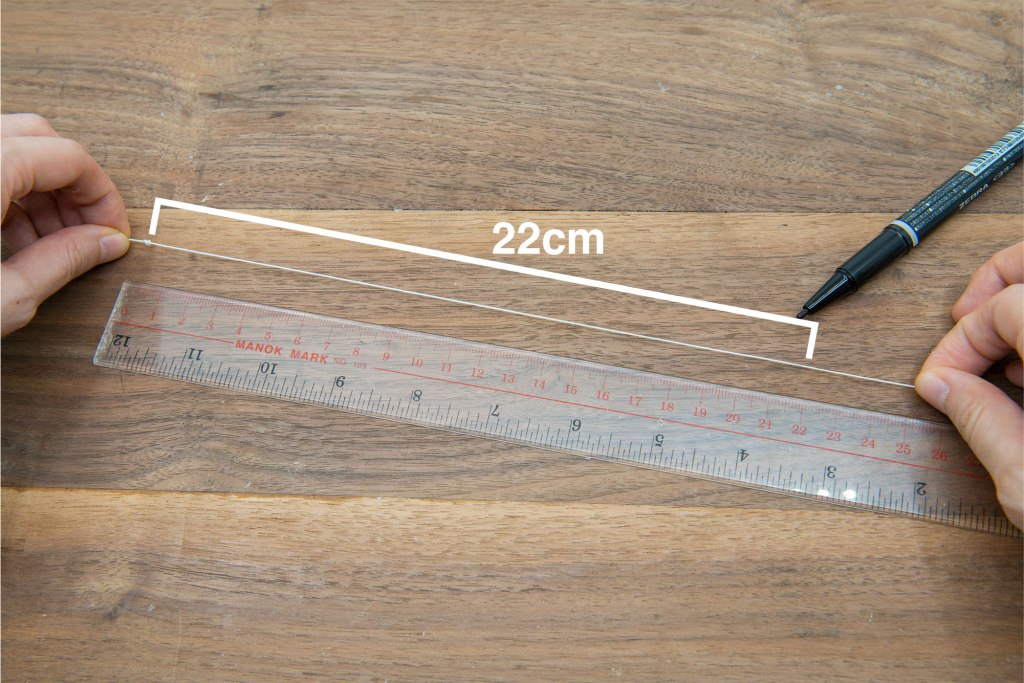
48/ 取出間尺,由繩尾的大結開始22cm的位置,用marker在繩上標記。
48/ Take out the measuring ruler, use a marker to mark the position 22cm from the big knot on the rope.

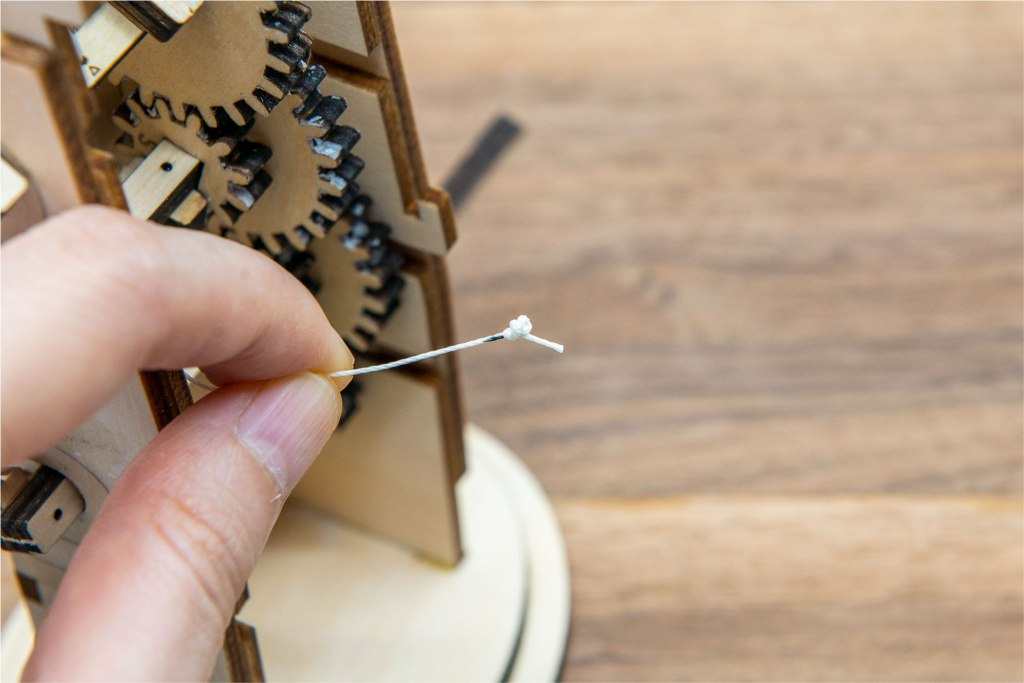
49/ 取出手指,手指頭內、木板上有一個少孔,穿入剛處理的繩。
49/ There is a small hole on the wood board inside the fingertip, pass the rope through the hole.
50/ 將繩穿過每一節手指內的木板。
50/ Thread the rope through the board inside each finger joint.
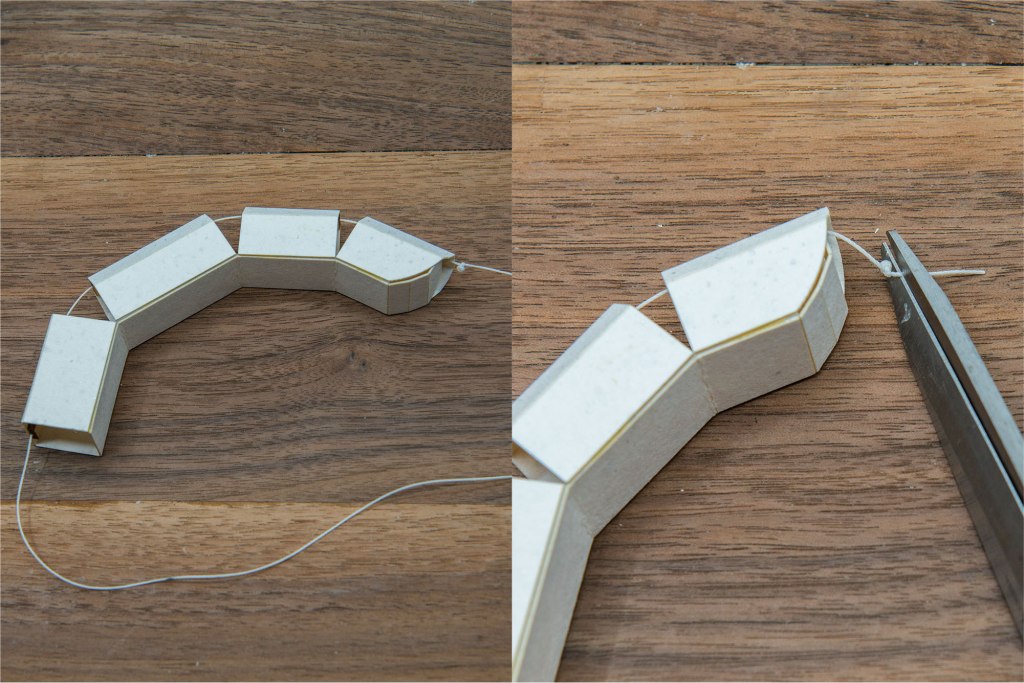
51/ 完全如上圖,將打結後多出繩尾剪走。
51/ Finished as above, cut off the excess rope ends.
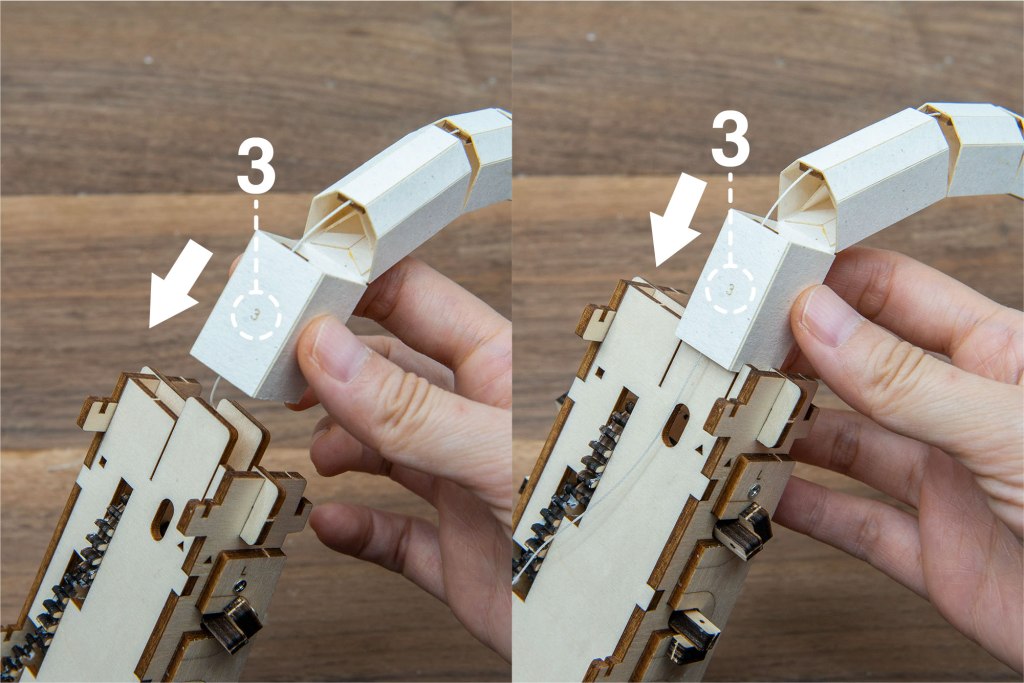
52/ 如上圖將手指組裝到木機身上,注意3號字樣是向外的。
52/ Assemble the finger to the wooden body as shown above, please aware that the number 3should be facing outwards.
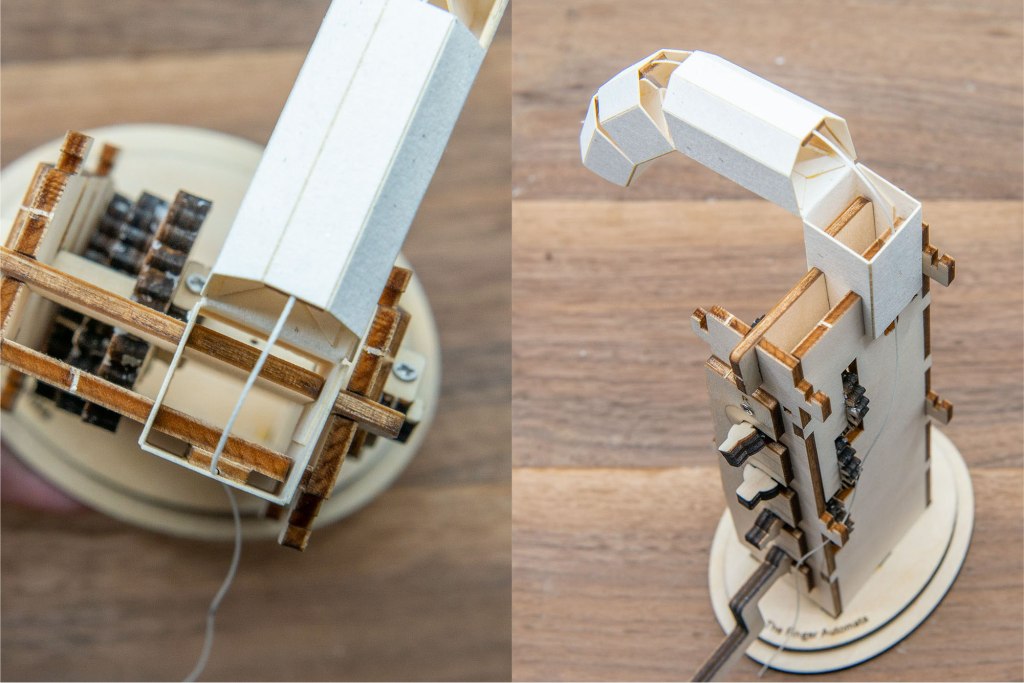
53/ 完全圖如上。
53/ Finshed as above. (top view and side view)
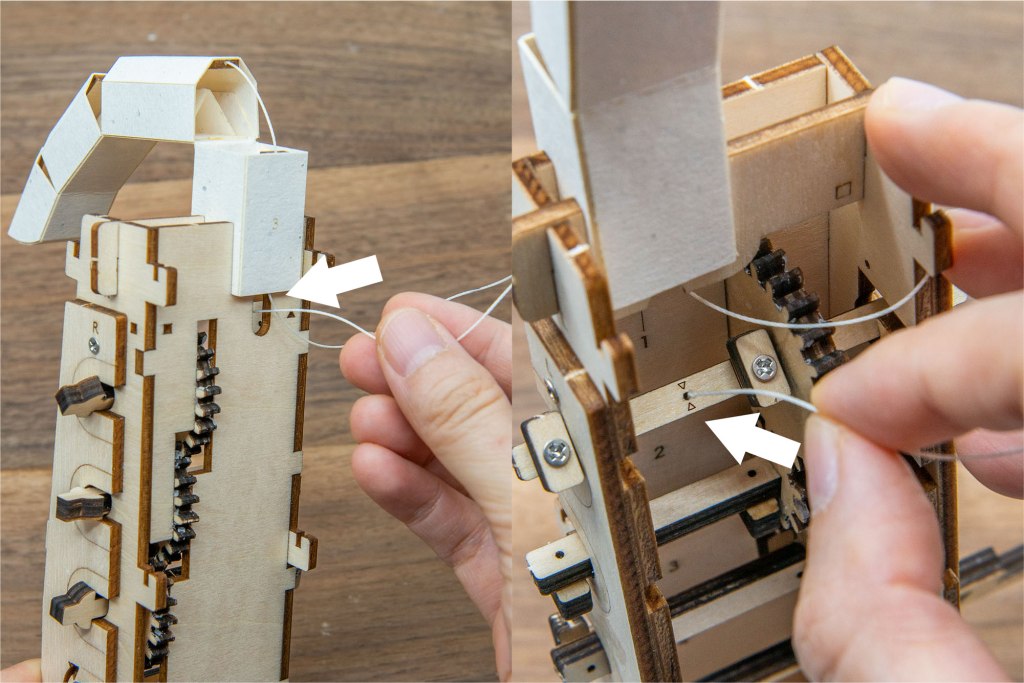
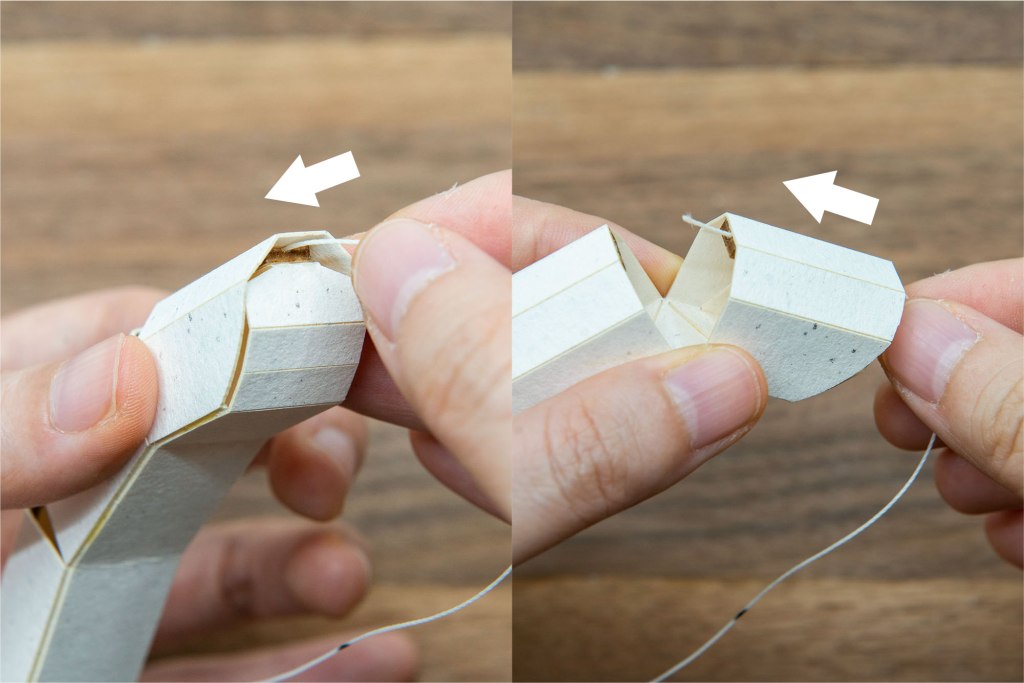
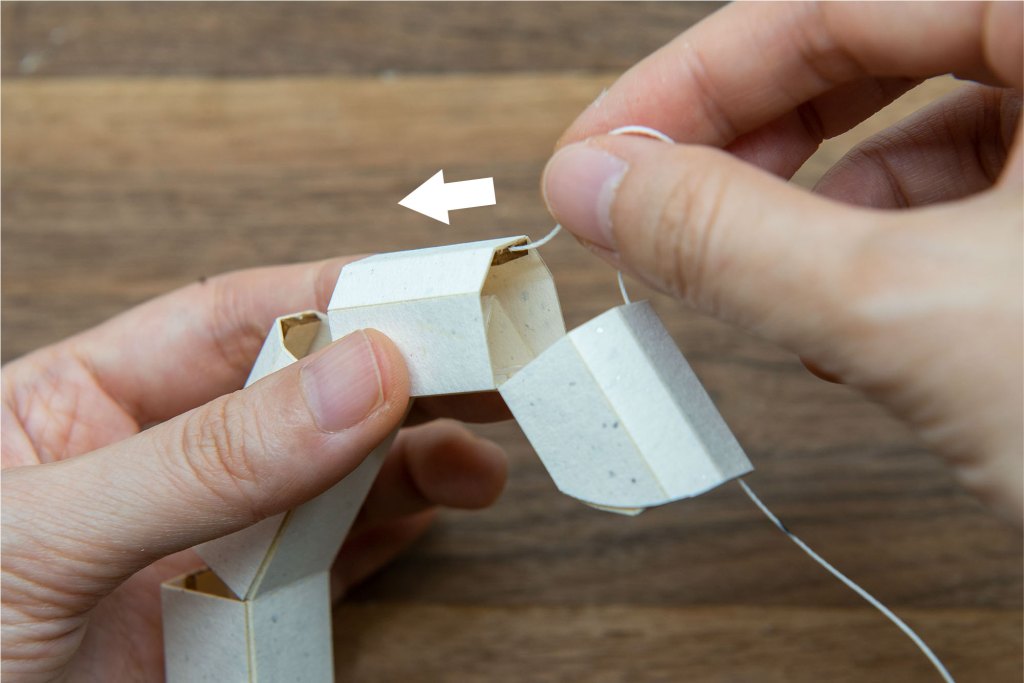
54/ 將繩穿過圖左箭咀所示的小孔;然後穿過圖右箭咀所示的小孔。
54/ From the left picture to the right picture: pass the rope through the hole indicated by the arrow.
55/ 在之前用marker標示了黑點的地方,重複打4-5個結。
55/ Repeatedly tie 4-5 knots where you marked the black spot with a marker.
56/ 打結後將多出的繩尾剪掉。
56/ Finished as above, cut off the excess rope ends.
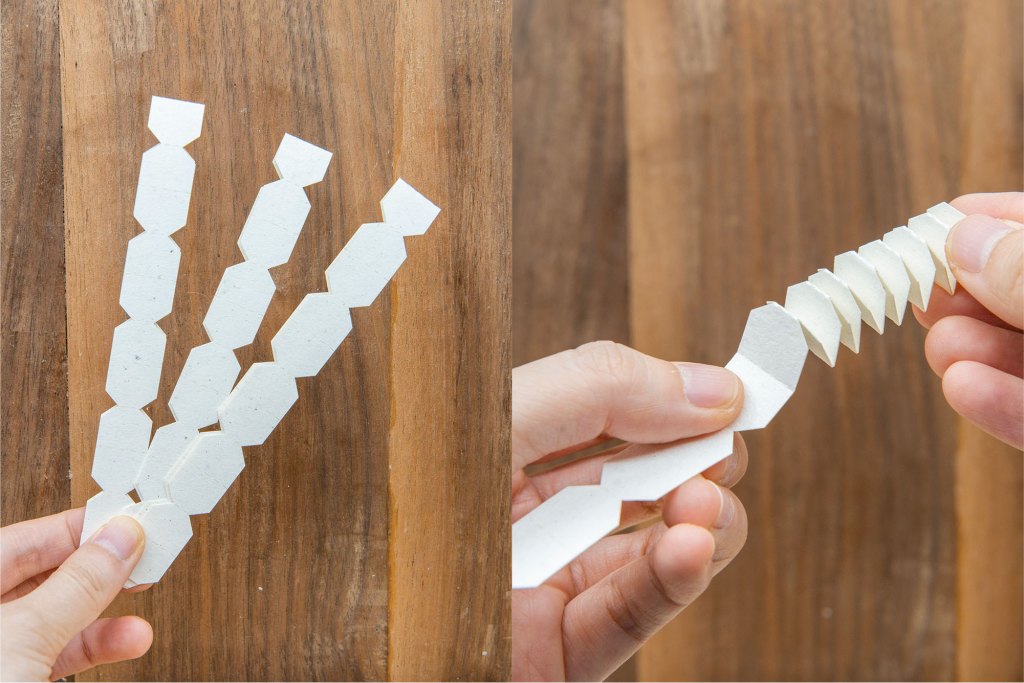
57/ 取出以上3條紙材料,摺成彈弓形。
57/ Take out the above materials X3, and fold them as the right picture.
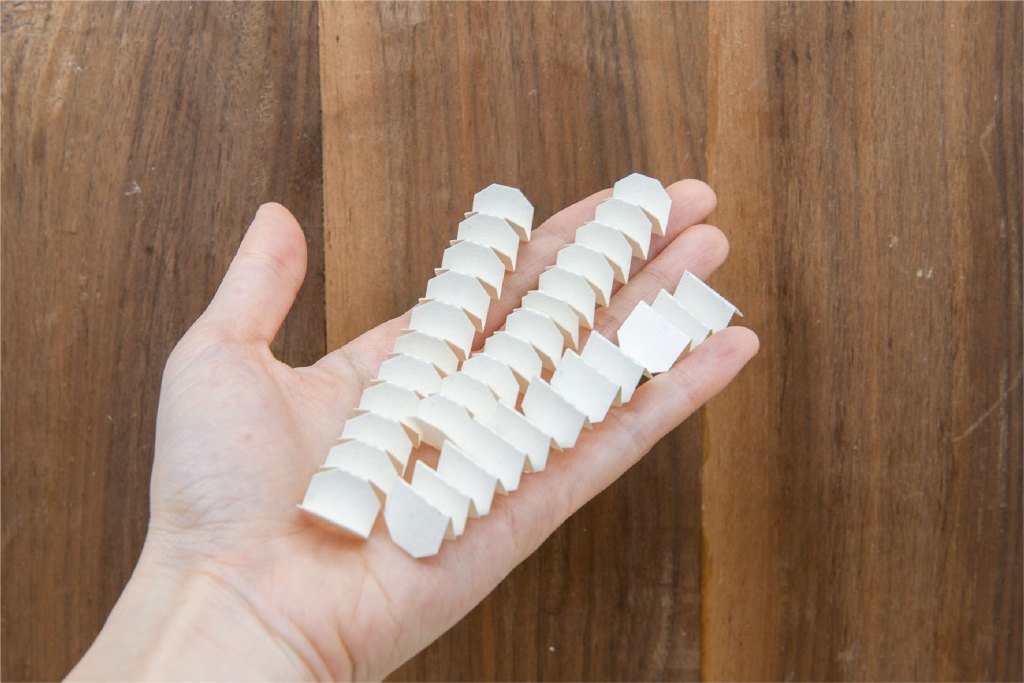
58/ 完成如上圖。
58/ Finished as shown above.
59/ 將紙彈弓裝入上圖的位置。
59/ Insert the paper spring into the above area.
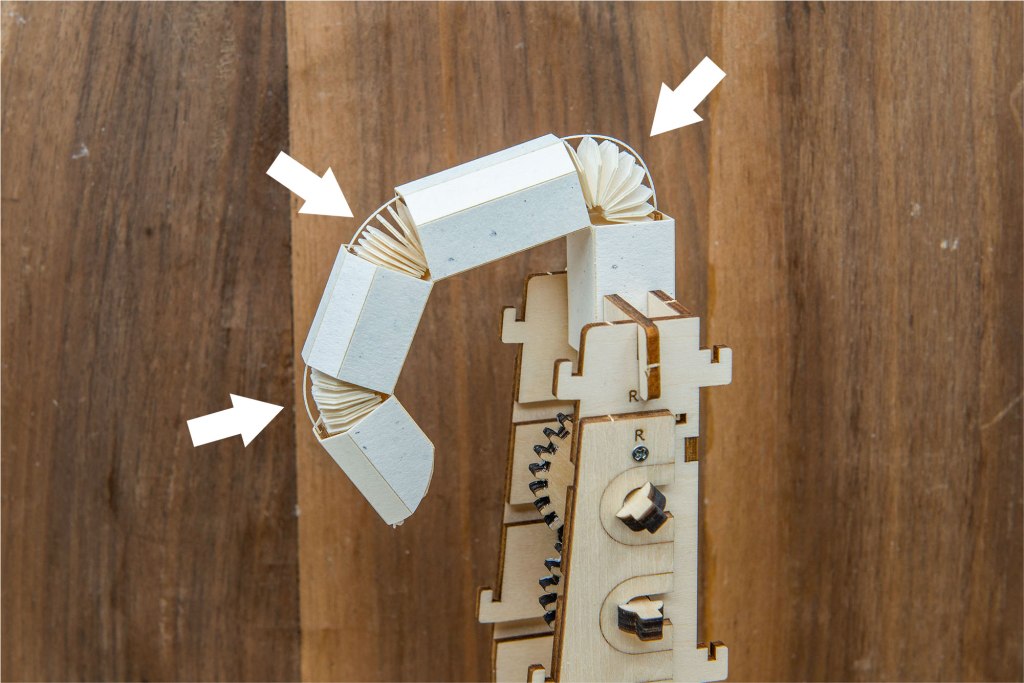
60/ 完成安裝三組紙彈弓如上圖。
60/ Complete the installation of three sets of paper spring as shown above.
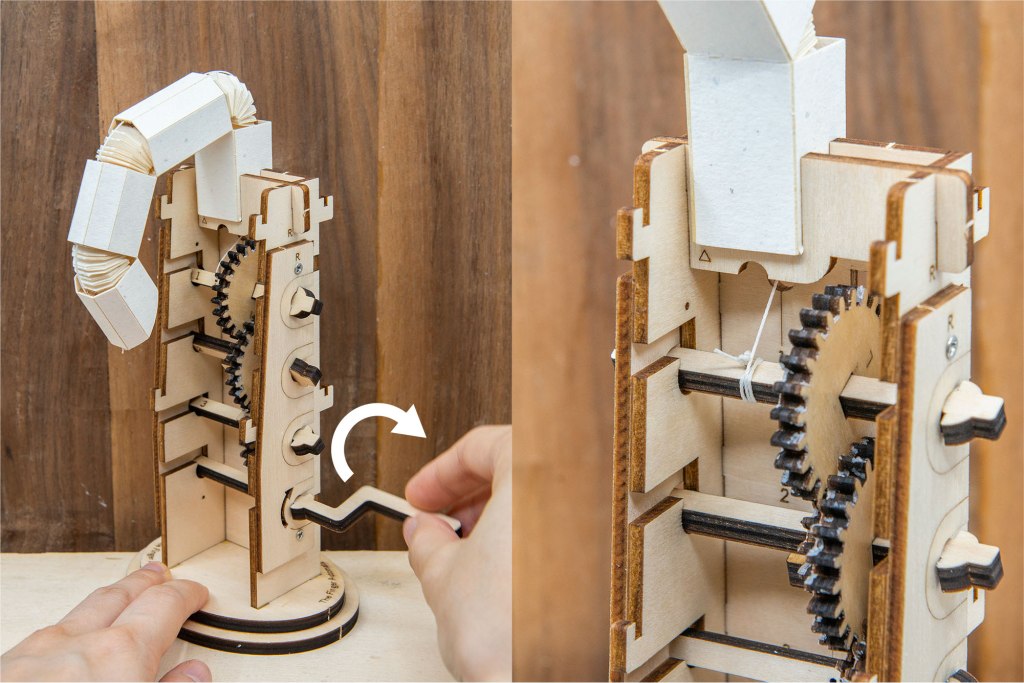
61/ 順時針轉動把手,手指會慢慢升起,繩子如圖右卷在1號桿上。
61/ Turn the handle clockwise, the finger will slowly rise, and the rope will be wrapped around pole 1 as shown on the right.
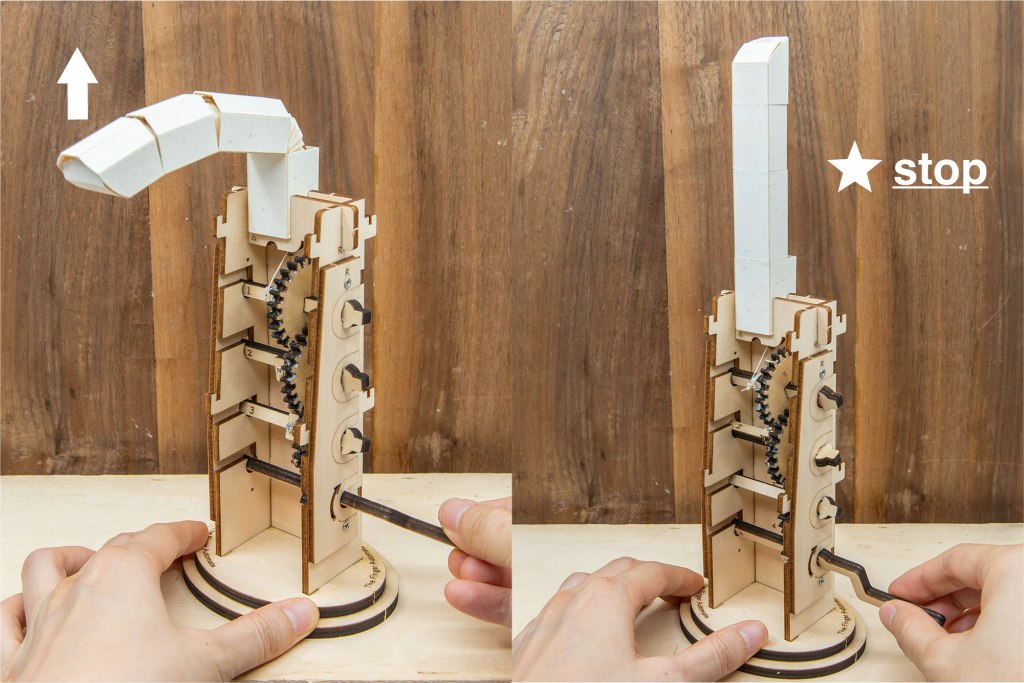
62/ 當手指完全伸直的時候,停止轉動把手;此時逆時針轉動把手便可把反手指收回。
62/ When the finger is fully straightened, stop turning the handle; then turn the handle counterclockwise to retract.
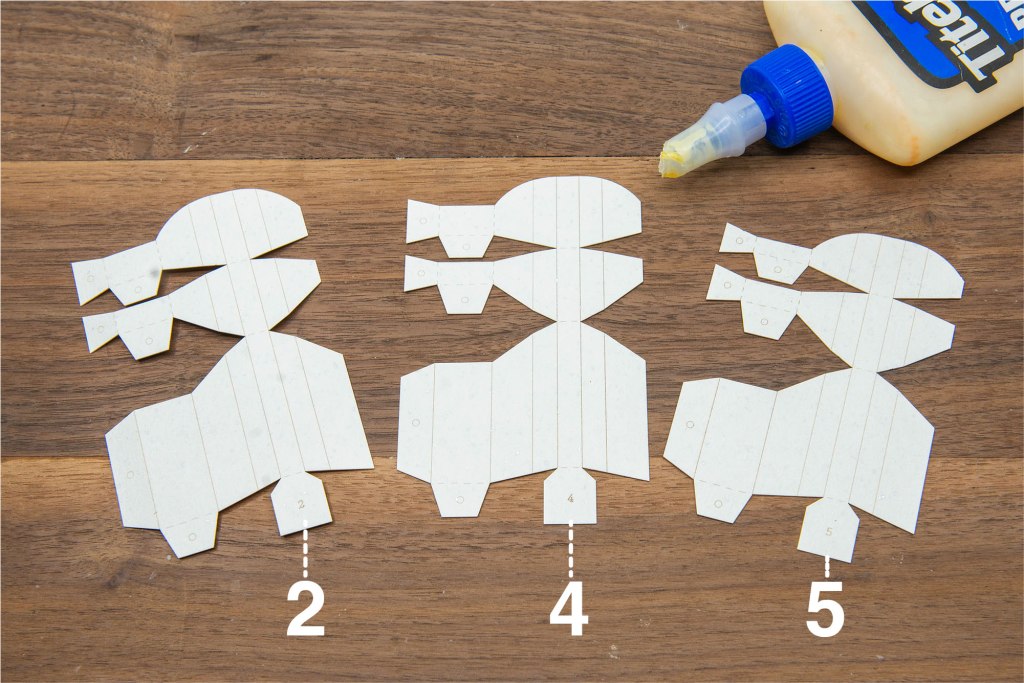
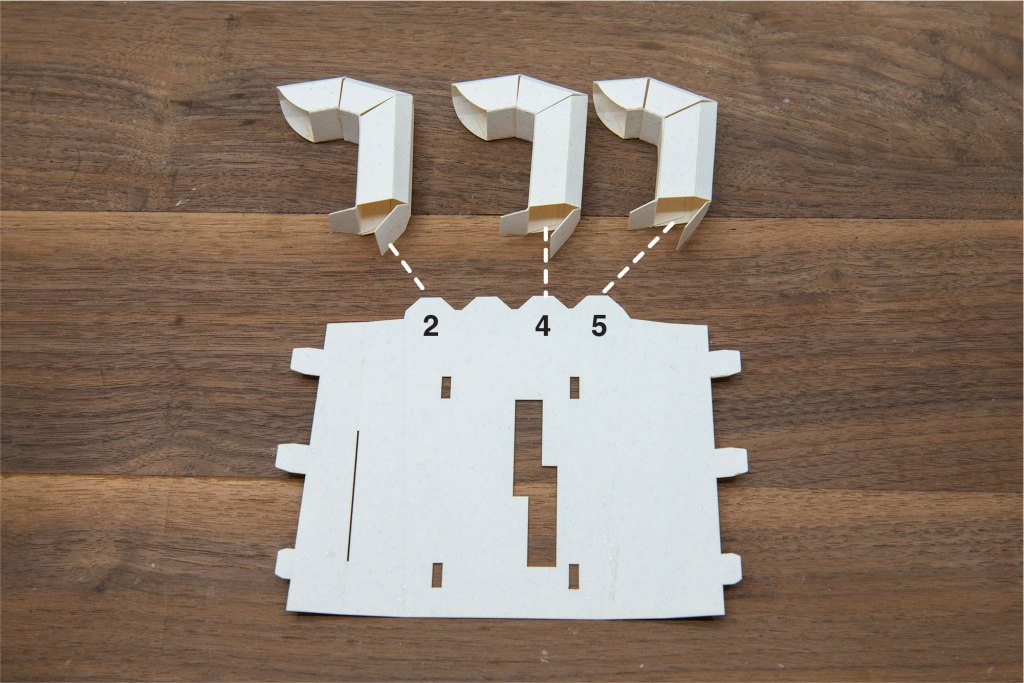
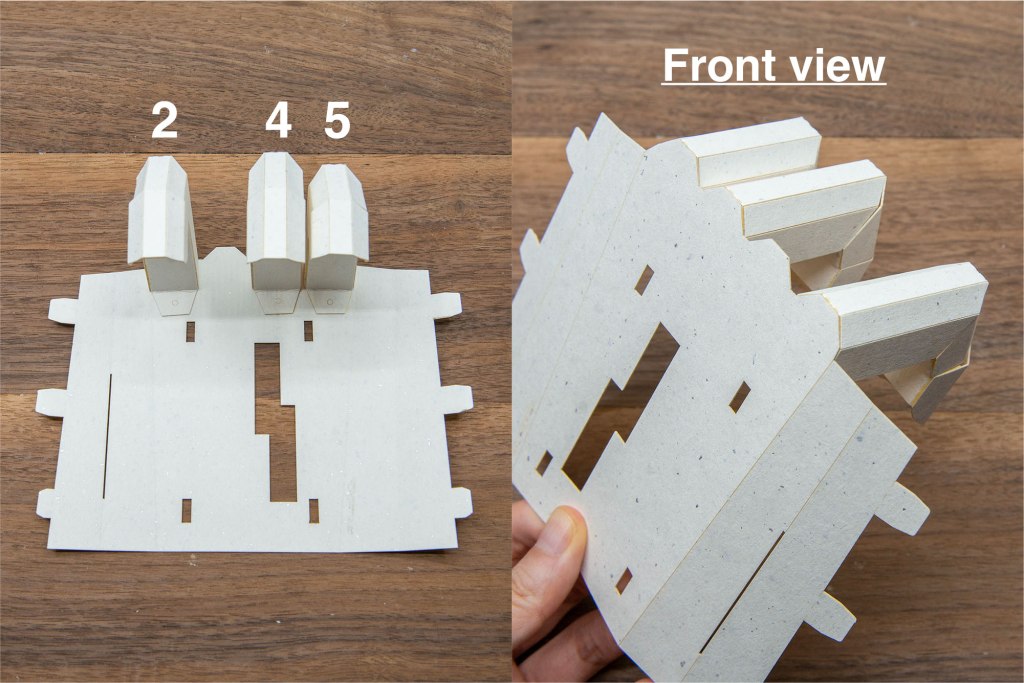
63/ 取出以上2、4、5號材料。
63/ Take the above 2,4,5 paper out.
64/ 如上圖用木工膠水黏合。
64/ Glue the paper component as shown above.
65/ 每一節手指逐一黏好。
65/ Glue each part one by one, let dry.
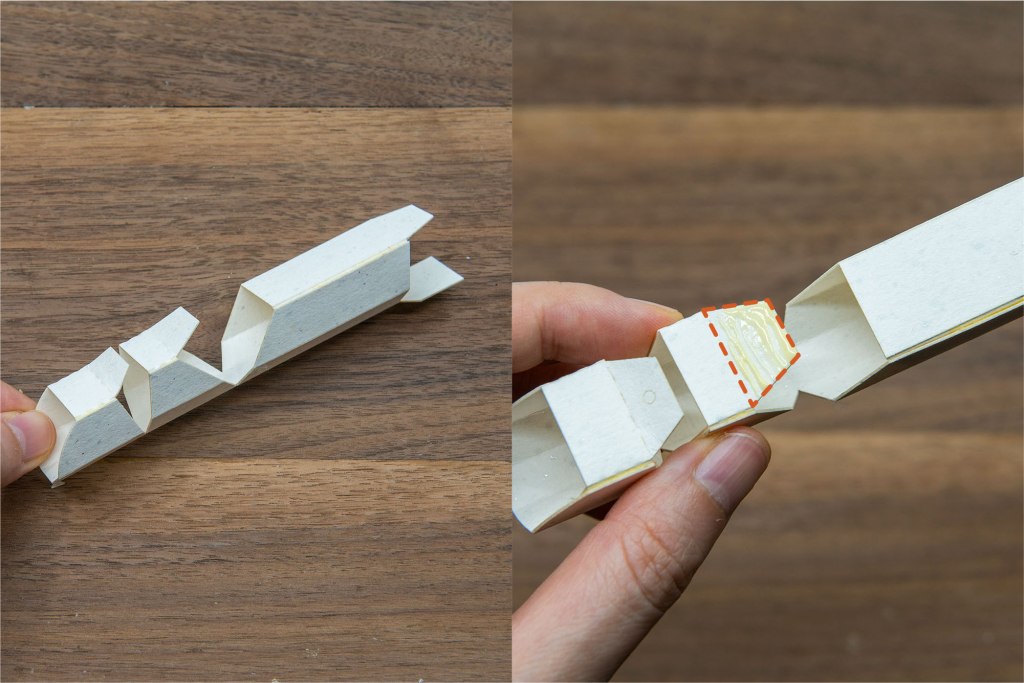
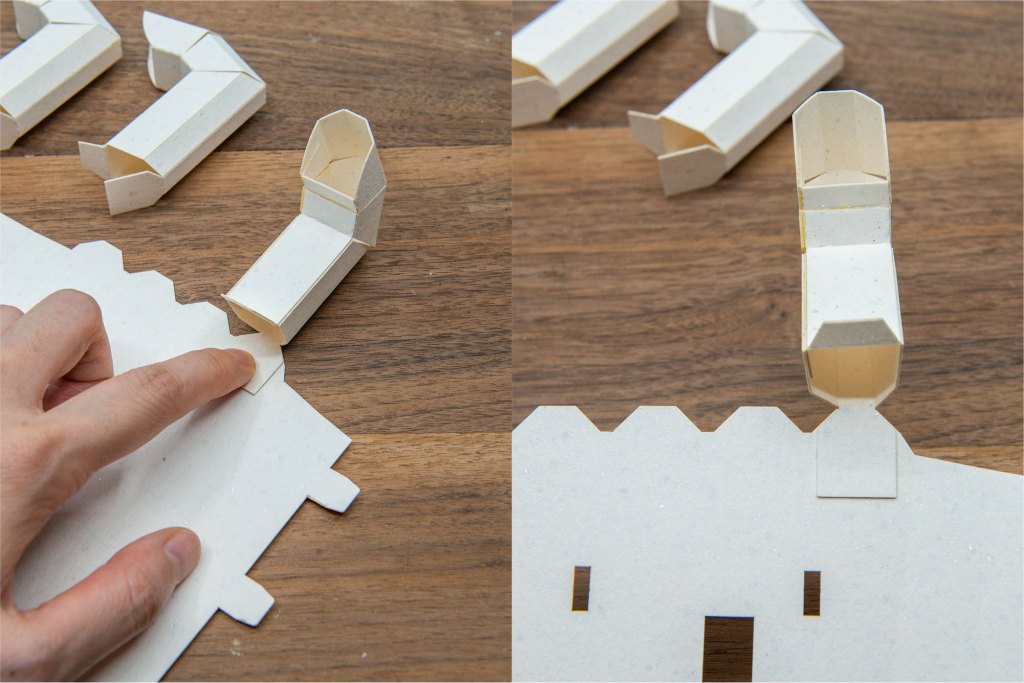
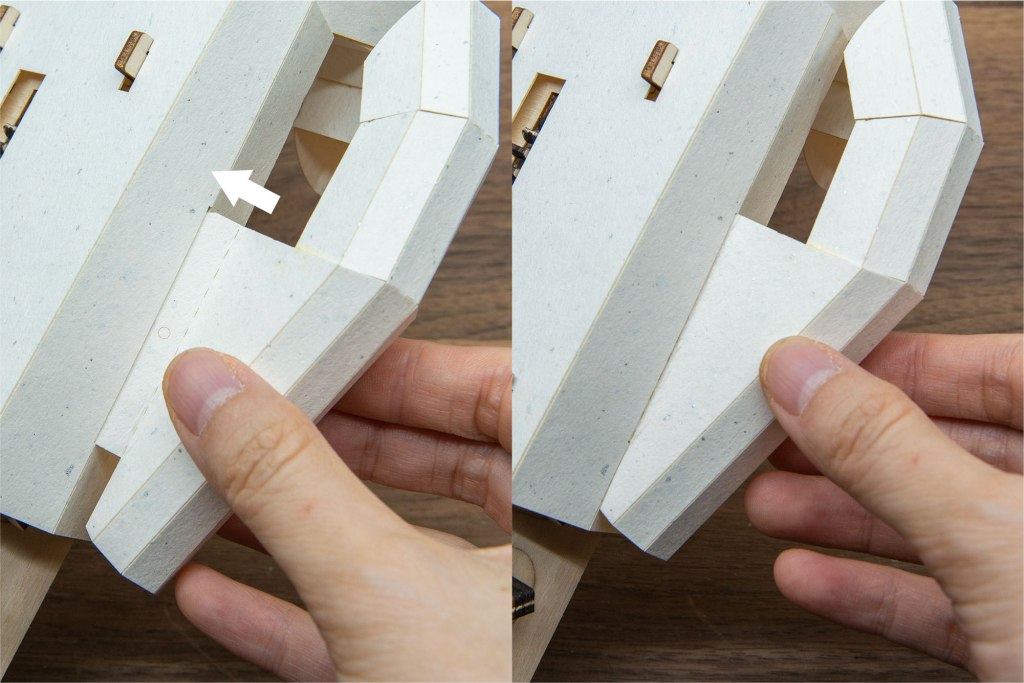
66/ 在虛線所示的位置塗上適當木工膠水。
66/ Apply wood glue to the area indicated by the dotted lines.
67/ 如圖左將塗了膠水的部份攝入內黏好,圖右的部份塗上適量木工膠水。
67/ Glue the parts as shown above.
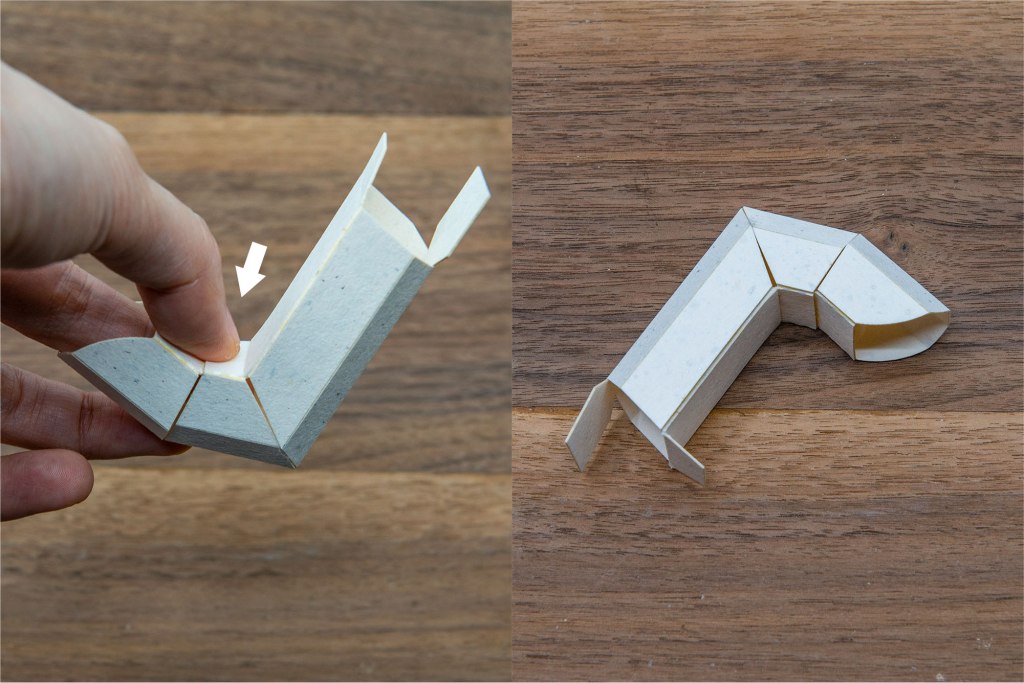
68/ 完成的手指如上圖。
68/ Finished finger as shown above.
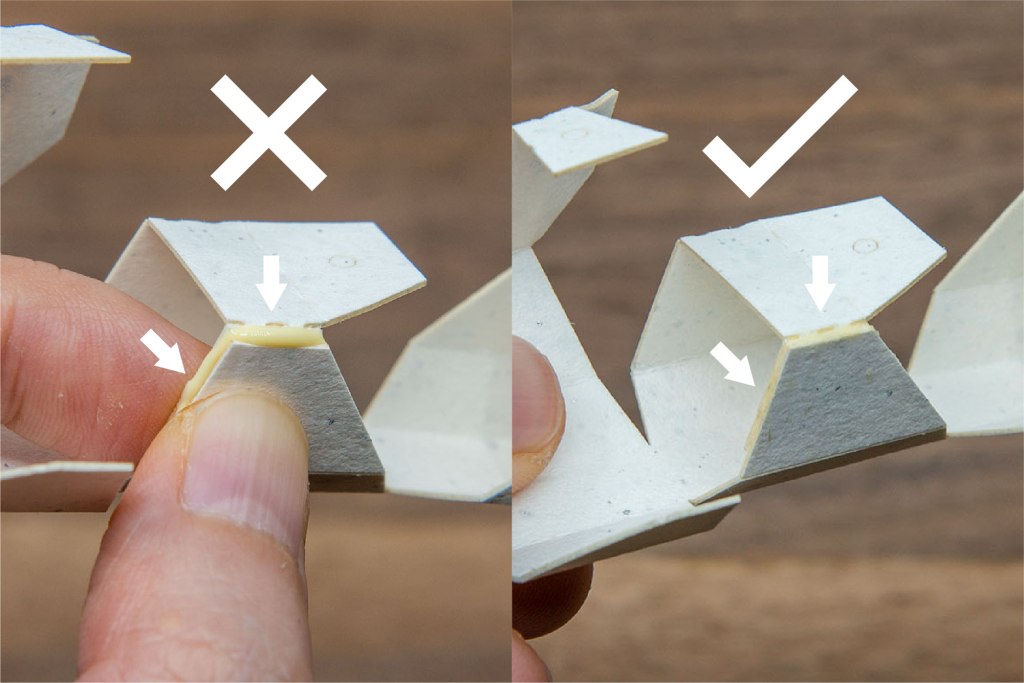
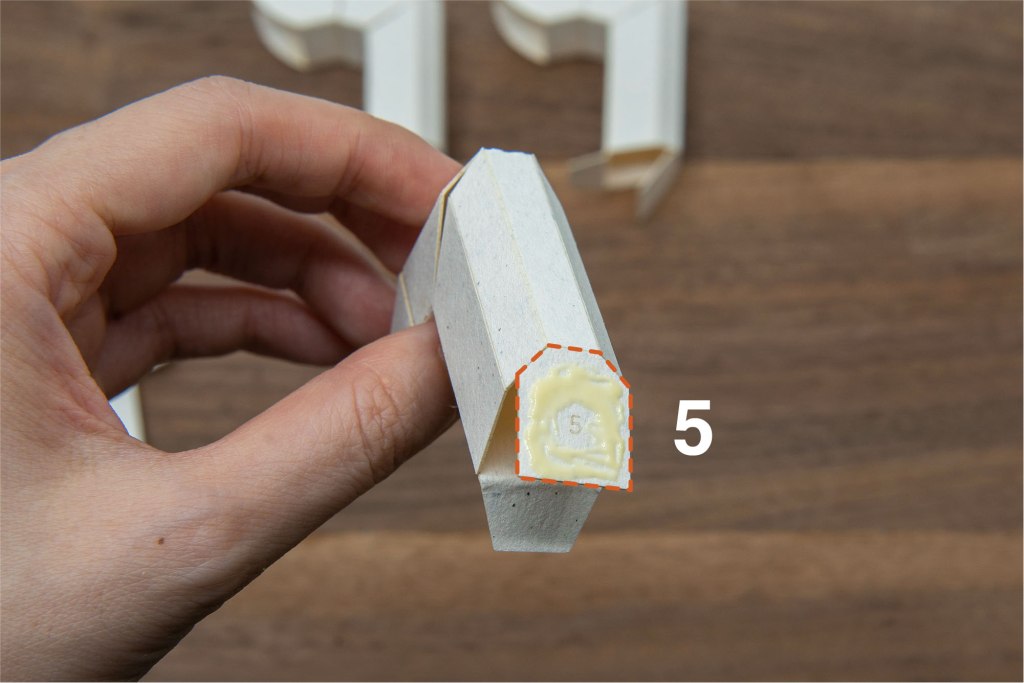
69/ 請注意膠水的份量,圖左溢出的膠水乾透後會呈黃色,影響外觀,請在膠水乾透前清理多出的膠水。
69/ Please pay attention to the amount of glue. The overflowing glue on the left picture will turn yellow after drying, which will affect the appearance. Please clean up the excess glue before the glue dries.
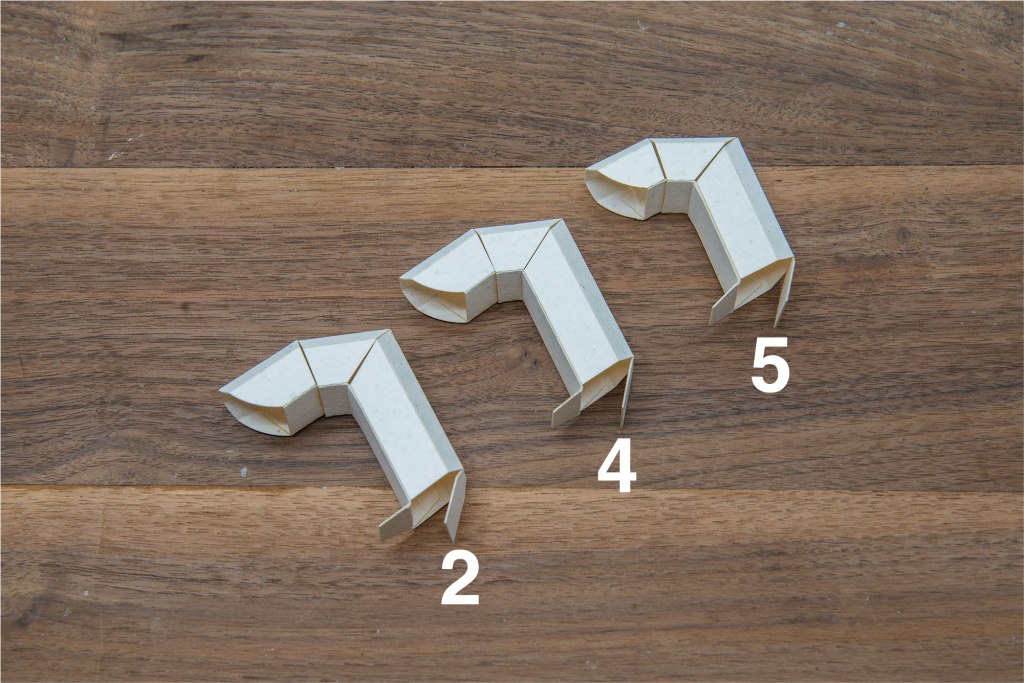
70/ 完全的2、4、5手指如上圖。
70/ Finished 2,4,5 finger as shown above.
71/ 取出以上材料,有黑色文字和線的那面是正面。
71/ Take out the above material, the side with engraved text and lines is the front side.

72/ 反轉到背面,2、4、5號手指的位置如上圖。
72/ Flip to the back, and the location of fingers No. 2, 4, and 5 are as shown above.
73/ 2、4、5號手指的位置如上圖。
73/ The location of fingers No. 2, 4, and 5 are as shown above.
74/ 取出5號手指,在虛線位置塗上適量木工膠水。
74/ Take Finger no. 5 out, apply wood glue in the dotted area.
75/ 如上圖,在5號的位置黏上5號手指。
75/ Glue finger no.5 on the area shown above.

76/ 在圖左,手指的底部塗(虛線位置) 上木工膠水,如圖右黏好。
76/ Shown in the left picture, apply glue on the bottom of the finger (indicated by dotted line), and glue as shown on the right.
77/ 2、4號手指如上圖黏好。
77/ Glue fingers 2 and 4 as shown above, let dry.
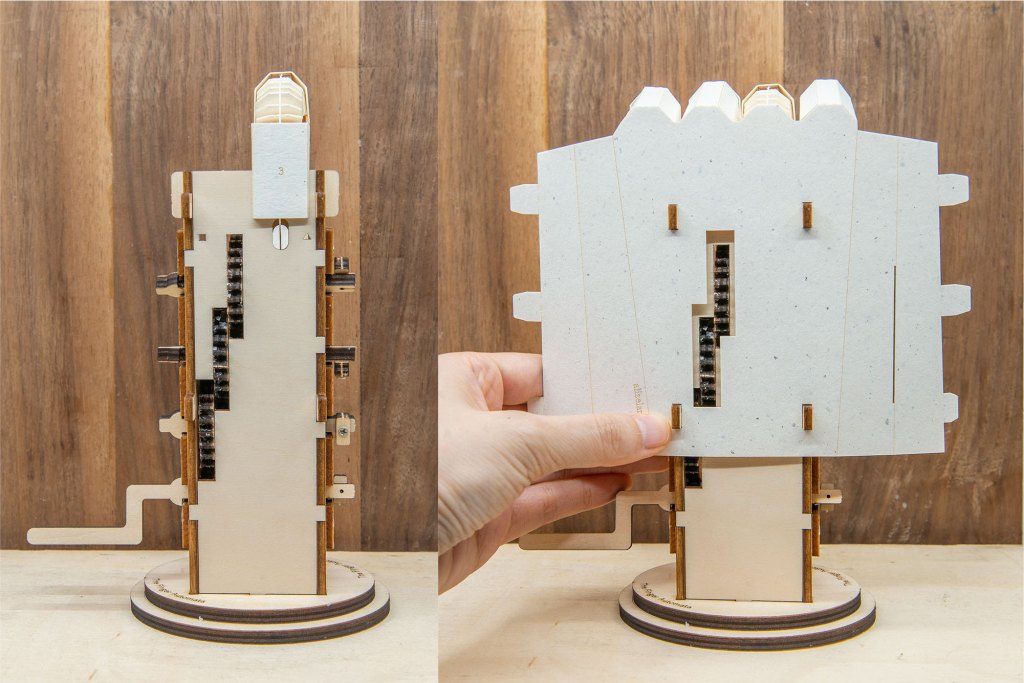
78/ 取出木主機身,如圖右,將完成的手部紙零件對齊四個方形孔並裝上 (注意木機身的前後方向。)
78/ Take out the wooden body, as shown on the right picture, align the completed hand paper parts with the four square holes and install them (pay attention to the front and back direction of the wooden body).
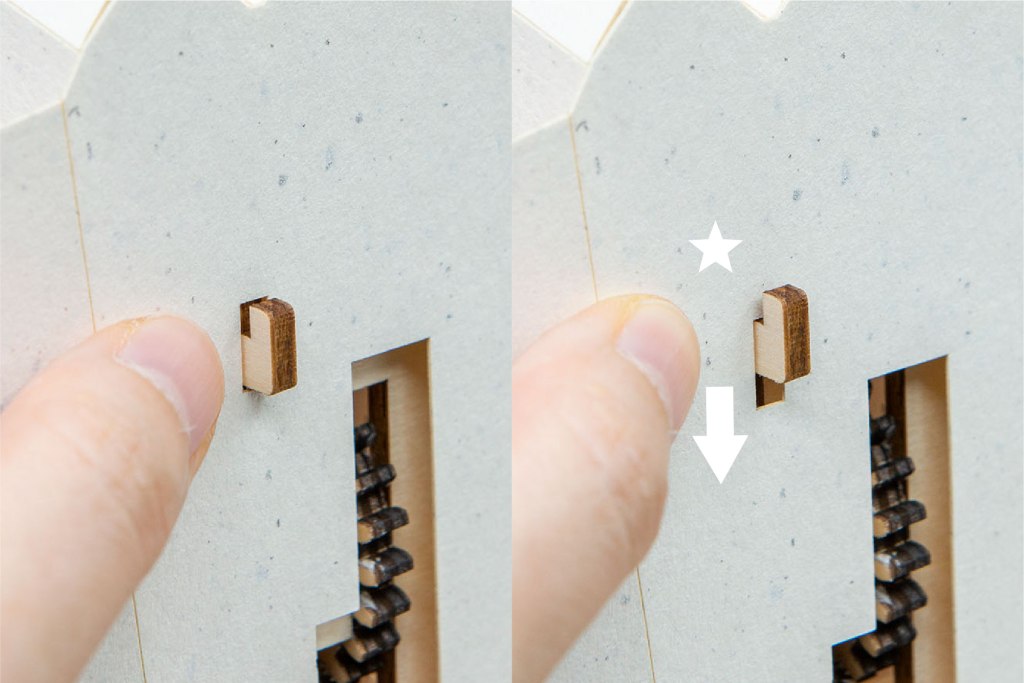
79/ 對齊方形孔後,如圖右,將卡紙住下拉。
79/ After aligning the square holes, as shown on the right, pull down the paper card so the parts would not fall out.
80/ 完成後,轉到另一邊。
80/ Turn to the other part after finished.
81/ 將另一個紙零件,如圖右裝上。
81/ Install another paper parts as shown on the right picture.

82/ 對齊方形孔後,將卡紙住下拉。
82/ After aligning the square holes, pull down the paper card so the parts would not fall out.

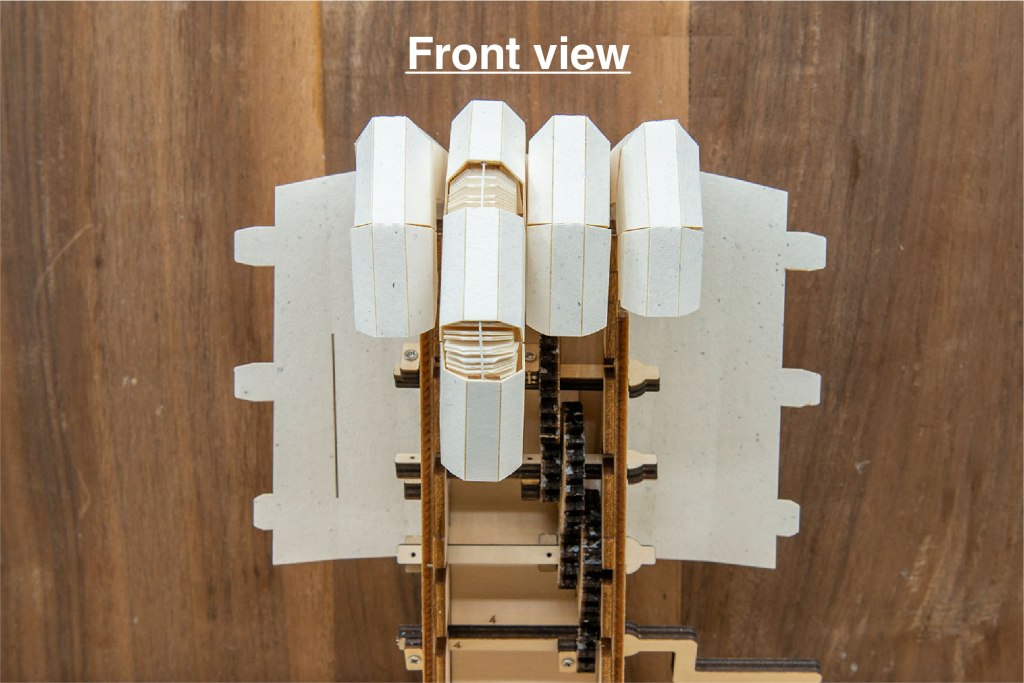
83/ 如圖左,將3個凸出的紙口位攝入對應的位置。
83/ As shown in the left picture, insert the three paper openings into the corresponding positions.
84/ 只一邊也是相同做法。
84/ Repeat the same on the other side.
85/ 取出以上紙零件,將黑色線輕輕向下屈。
85/ Take the above component out, gently bend the black line downwards.
86/ 反轉到背面,在圖左虛線位置塗上適量木工膠水,如圖右黏好手指公。
86/ Turn to the back side, apply wood glue to the dotted area, glue the thumb as the right picture.

87/ 在圖左的虛線位置塗上木工膠水,如圖右黏好。
87/ Apply glue on the dotted area in the left picture, glue as shown in the right picture.
88/ 如上圖黏好手指公。
88/ Finished gluing the thumb as shown above.
89/ 完成如上圖。
89/ Finished as shown above.
90/ 如上圖,將手指公的紙口位攝入對應的位置。
90/ As shownabove, insert the paper opening of the thumb into the corresponding position.
91/ 完成如上圖。
91/ Finished as above.
92/ 另一邊如上圖組裝,有需要的話可加上少許木工膠水。
92/ Assemble the other side as shown above, apply a little bit of wood glue if needed.
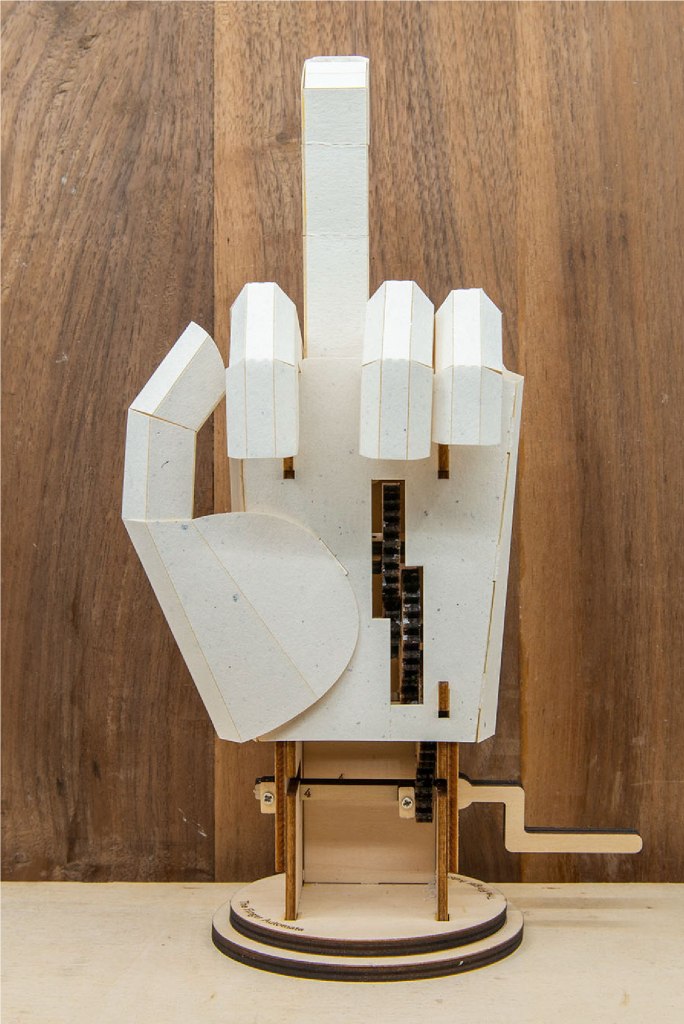
93/ 完成!謝謝各位!
93/ Done! Thank you and I hope you all enjoyed the making process!
注意:當轉動把手至中指伸到最直時,請反方向轉動以放下中指。
Note: When turning the handle until the middle finger reaches its straightest position, please turn in the opposite direction to retract the finger.
